Loading...
Loading...
Loading...
Loading...
Loading...
Loading...
Loading...
Loading...
Loading...
In this section, you will find all the necessary information for using and integrating the Unico IDCloud platform SDK into your Flutter applications
Nesta seção, você encontrará todas as informações necessárias pra implementar o SDK Flutter da plataforma Unico IDCloud
In this section, you will find all the updates for the Unico IDCloud Flutter SDK
Keep your Android SDK always up to date with the latest available version. Semantic versioning is used to number the versions. For more information, please refer to the article Overview.
Native SDK Update:
Android version 5.39.0 release notes;
iOS version 2.20.0 release notes.
In the next releases we will adopt version 8.x of Sentry.
Native SDK Update:
Android version 5.38.0 release notes;
iOS version 2.19.0 release notes.
In the next releases we will adopt version 8.x of Sentry.
Native SDK Update:
Android version 5.37.0 release notes.
Native SDK Update:
iOS version 2.18.1 release notes.
Native SDK Update:
Android version 5.36.2 release notes.
Sentry compatibility fix.
Critical Update
Native SDK Update:
Android version 5.36.0 release notes;
iOS version 2.18.0 release notes.
Native SDK Update:
Android version 5.35.0 release notes;
iOS version 2.17.2 release notes.
Update the minimum iOS version to iOS 12 and Xcode 16.
Native SDK Update:
Android version 5.34.0 release notes;
iOS version 2.17.1 release notes.
Native SDK Update:
Android version5.33.0 release notes;
iOS version 2.16.12 release notes.
Critical Update
Native SDK Update:
Android version 5.32.0 release notes;
iOS version 2.16.11 release notes.
Native SDK Update:
Android version 5.31.0 release notes;
iOS version 2.16.10 release notes.
Native SDK Update:
Android version 5.30.1 release notes;
iOS version 2.16.9 release notes.
Native SDK Update:
Android version 5.29.0 release notes;
iOS version 2.16.8 release notes.
Native SDK Update:
Android version 5.28.0 release notes;
iOS version 2.16.7 release notes.
Native SDK Update:
Android version 5.27.0 release notes;
iOS version 2.16.5 release notes.
Native SDK Update:
Android version 5.25.0 release notes.
Native SDK Update:
Android version 5.24.0 release notes;
iOS version 2.16.4 release notes.
Still need help?
Didn't find something or still need help? If you're already a client or partner, you can reach out through our Help Center.
In this section, you will find all the necessary information for using and integrating the Unico IDCloud platform SDK into your Flutter applications for selfie capture
This guide has been created to help you implement the Flutter SDK quickly and easily. Below is the step-by-step process for the entire integration. After that, if you wish to customize the experience, be sure to check the Flutter Customization section.
To get started, create an instance of the builder (generated through the UnicoCheckBuilder interface), providing the context and environment as parameters, along with the implementation of the UnicoListener class.
The implementation of this class is quite simple and can be done with just a few lines of code. All you need to do is override the callback methods with your application's business logic.
class _MyHomePageState extends State<MyHomePage> implements UnicoListener {

    late UnicoCheckBuilder _unicoCheck;


      @override
      void onErrorUnico(UnicoError error) {}

      @override
      void onUserClosedCameraManually() {}

      @override
      void onSystemChangedTypeCameraTimeoutFaceInference() {}

      @override
      void onSystemClosedCameraTimeoutSession() {}
}Configure the environment that will be used to run the SDK. Use the enumerated environment that contains the following enumerates:
UnicoEnvironment.PROD: for production environment;
UnicoEnvironment.UAT: for approval environment.
See how to implement it in the example below:
_unicoCheck.setEnvironment(unicoEnvironment: UnicoEnvironment.UAT);Note that, as shown in the previous example, the implementation of the UnicoListener class mostly involves configuring the callback methods. Each method will be called in a specific situation based on the SDK's return.
Simply override the methods demonstrated in the previous step with your application's business logic:
onErrorUnico(UnicoError error)
When invoked, the method receives a parameter of type UnicoError, which contains details about the error. Learn more about the UnicoError type in the SDK's error handling documentation.
onUserClosedCameraManually()
This method is invoked whenever the user manually closes the camera, such as by clicking the "Back" button.
onSystemClosedCameraTimeoutSession()
This method is invoked as soon as the maximum session time is reached (without capturing any image).
It can be configured in the builder through the setTimeoutSession method. This method should receive the maximum session time in seconds. You can change the maximum session time for your user by using the face detection feature (Selfie camera with smart capture). If the user exceeds the time defined in your process to capture the photo, you can display a customizable message or instruction to the user. The default value is 40 seconds, and the minimum value is also 40 seconds.
onSystemChangedTypeCameraTimeoutFaceInference()
This method is invoked as soon as the maximum time for detecting a user's face is reached (without detecting anything). In this case, the camera mode is automatically changed to manual capture mode (without the smart capture silhouette).
The maximum capture time when using face detection (Selfie camera with smart capture) is 13 seconds. If the user has difficulty capturing the photo via face detection and exceeds the time set in your process, the capture mode automatically switches to manual to make the process easier for the user (TimeoutToFaceInference).
All of the above methods must be created as indicated in your project (even if with no logic). Otherwise, the project will not compile successfully.
The SDK has intelligent framing and automatic capture configured and enabled by default. As a result, you should configure the camera mode in your builder as follows:
UnicoCheckCameraOpener _opener = new UnicoCheck (this)
    .setAutoCapture(autoCapture: true)
    .setSmartFrame(smartFrame: true)
    .build();
The false/true values for the methods above do not alter the capture experience; they are only used for the internal logic of the SDK's functionality.
The camera opening method needs to know what to do when it successfully captures an image or encounters an error during the process. "What to do" is informed to the camera opening method by implementing listeners, which are called in cases of success or error.
Through the implementation of these listeners, you can specify what happens in your app in case of error (onErrorSelfie method) or success (onSuccessSelfie method) when capturing images.
onSucessSelfie MethodWhen successfully capturing an image, this method is invoked and returns an object of type ResultCamera, which is later used in the REST API requests:
@override
void onSuccessSelfie(ResultCamera result) { }
The ResultCamera object returns 2 attributes: base64 and encrypted:
The base64 attribute can be used if you want to display a preview of the image in your app.
The encrypted attribute must be sent in the REST API calls by Client.
The encrypted attribute is strictly intended for sending the image through the by Client APIs. It should not be opened or serialized, as its characteristics can be altered without prior notice. Its use should be exclusive for interactions with the APIs to ensure data integrity and security. Unico is not responsible for any damages resulting from this practice, as modifications can occur unexpectedly.
The base64/encrypted files may vary in size depending on several factors, including the quality of the devices and the photos generated by them, as well as Unico's business rules. To avoid issues in your application, do not limit the size of the string generated by the SDK for these files in your programming logic or infrastructure.
If you need to convert base64 to bitmap, the standard method doesn't work for Android. It is necessary to perform a split at the comma (,) for it to work. If you want to know more, read the article: How to convert a Base64 string into a Bitmap image to show it in an ImageView?
onErrorSelfie MethodIf an error occurs during the image capture, this method is invoked and returns an object of type UnicoError:
@override
void onErrorSelfie(UnicoError error) { }The openCameraSelfie method is used to open the camera. This method takes as parameters the implementation of the UnicoSelfie class and the JSON with the credentials, generated in the previous step.
The following example illustrates the steps for configuring the listeners and opening the camera:
_opener.openCameraSelfie(jsonFileName: androidJsonFileName, listener: this)Capturing the images is only the first part of the journey. After capturing the image, it is necessary to send the encrypted generated by the SDK to the REST APIs of by Client. Learn more in the CreateProcess section of by Client.
For security reasons, the interval between the generation of the encrypted and its sending via one of the available flows must be a maximum of 10 minutes. Submissions made beyond this period will be automatically rejected by the API.
Still need help?
Didn't find something or still need help? If you're already a client or partner, you can reach out through our Help Center.
In this section, you will find all the necessary information for handling errors from the Unico IDCloud SDK in your Android applications
UnicoError ObjectThis object is returned whenever an error occurs in the Flutter SDK.
Below is a list of possible error codes from the Flutter SDK:
Still need help?
Didn't find something or still need help? If you're already a client or partner, you can reach out through our .
getCode()
Method used to obtain the error code that occurred.
getDescription()
Method used to obtain the description of the error that occurred.
73001
Context invalid
73002
Did not grant permission to open camera
73003
The lest API is 21(LOLLIPOP)
73004
Could not find implementation interface callback iAcessoBioSelfie
73005
Could not find implementation interface callback iAcessoBioDocument
73006
Unable to open camera on emulators
73100
Unable to connect to internet
73200
Please inform the json file name
73202
Unable to parse json file
73300
Unable to get unico authentication object
73301
Unable to parse object
73302
Could not find the unico token
73303
Current host is not registered
73400
Could not initialize camera
73500
Unable to get session token, service response error
73501
Unable to parce object
73502
Could not get session token
73701
Could not find active liveness import
73702
Unable to initialize active liveness in production mode
73703
Unable to get active liveness session
73704
The user pressed the cancel button and did not complete the Session.
73705
The Session was not performed successfully and a FaceScan was not generated. In general, other statuses will be sent to the
73706
The camera access is prevented because either the user has explicitly denied permission or the user's device is configured to
73707
The Session was cancelled due to the app being terminated, put to sleep, an OS notification, or the app was placed in the
73708
The Session was cancelled because device is in landscape mode. The user experience of devices in these orientations is poor
73709
The Session was cancelled because device is in reverse portrait mode. The user experience of devices in these orientations is
73710
The Session was cancelled because the user was unable to complete a Session in the default allotted time or the timeout set
73712
The Session was cancelled due to memory pressure.
73712
The Session was cancelled because your App is not in production and requires a network connection.
73713
The Session was cancelled because your key needs to be validated again.
73714
The Session was cancelled because the developer-configured encryption key was not valid.
73715
The Session was cancelled because not all guidance images were configured.
73716
The Session was cancelled because SDK was unable to start the camera on this device.
73717
The Session was cancelled because the user was in a locked out state.
73718
The Session was cancelled because of an unknown and unexpected error. SDK leverages a variety of iOS APIs including camera,
73719
The Session cancelled because user pressed the Get Ready screen subtext message. Note: This functionality is not available by
73800
Could not build encrypted key
In this section, you will find all the necessary information for using and integrating the Unico IDCloud SDK into your Flutter applications for document capture
This guide has been designed to help you implement the Flutter SDK quickly and easily. Below, you will find a step-by-step process for the entire integration. After that, if you wish to customize the experience, be sure to check the Flutter Customization section.
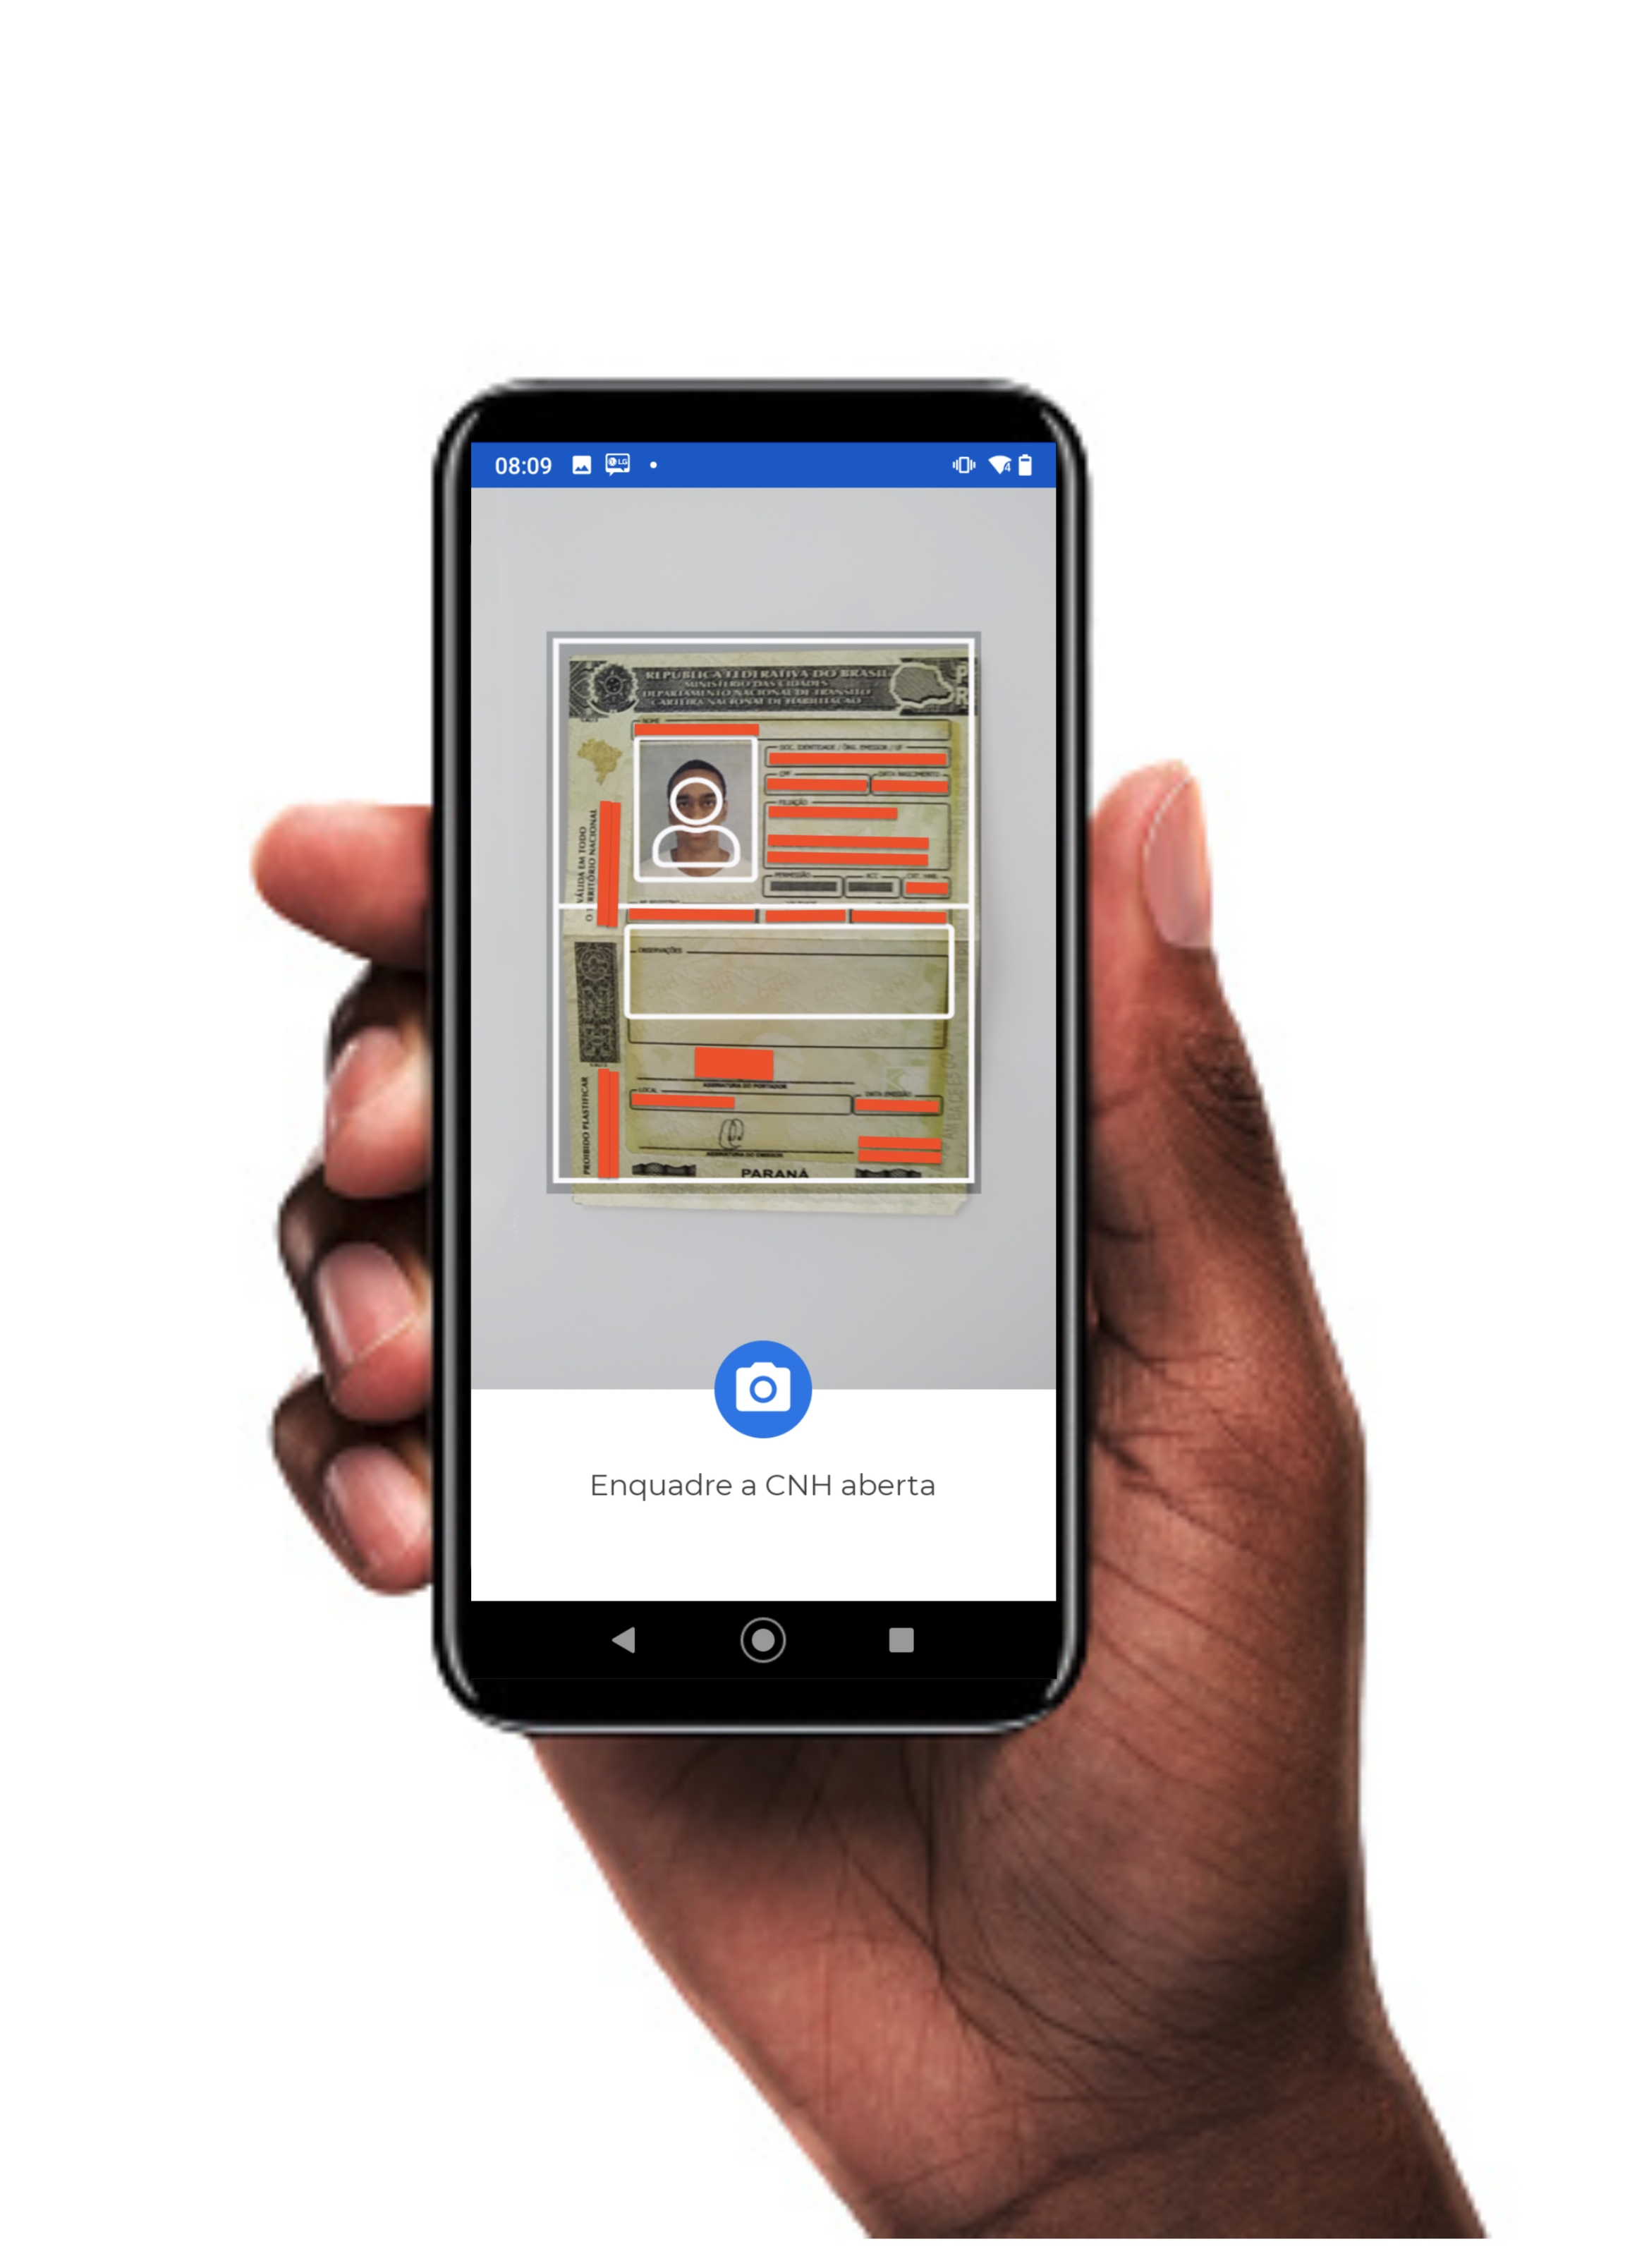
In this camera mode, there is a capture frame to assist the user in positioning the document correctly. Once the document is properly positioned, the user must click the button to take a photo of the document.
The SDK does not perform any validation of what is being captured.
In this camera mode, it is possible to capture the following documents:
CPF: Capture the front of the CPF;
CNH: Capture the open CNH;
CNH Front: Capture the front of the CNH;
CNH Back: Capture the back of the CNH;
RG Front: Capture the front of the RG;
RG Back: Capture the back of the RG;
Others: Capture any other document.
To get started, create an instance of the builder (generated through the UnicoCheckBuilder interface), providing the context and the implementation of the UnicoListener class as parameters.
The implementation of this class is quite simple and can be done with just a few lines of code. All you need to do is override the callback methods with your application's business logic.
class _MyHomePageState extends State<MyHomePage> implements UnicoListener {

    late UnicoCheckBuilder _unicoCheck;

    /// Unico callbacks
      @override
      void onErrorUnico(UnicoError error) {}

      @override
      void onUserClosedCameraManually() {}

      @override
      void onSystemChangedTypeCameraTimeoutFaceInference() {}

      @override
      void onSystemClosedCameraTimeoutSession() {}

      /// Document callbacks
      @override
      void onSuccessDocument(ResultCamera resultCamera) { }

      @override
      void onErrorDocument(UnicoError error) { }

}Note that, as in the previous example, the implementation work of the UnicoListener class is largely about configuring the callback methods. Each method is called in a specific situation based on the SDK's response.
Override the methods exemplified above with your application’s business logic:
onErrorUnico(UnicoError error)
When invoked, the method receives a parameter of type UnicoError, which contains details about the error. Learn more about the UnicoError type in the SDK's error handling section.
onUserClosedCameraManually()
This method is invoked whenever the user manually closes the camera, such as by clicking the "Back" button.
onSystemClosedCameraTimeoutSession()
This method is invoked as soon as the maximum session time is reached (without capturing any image).
It can be configured in the builder through the setTimeoutSession method. This method should receive the maximum session time in seconds. You can change the maximum session time for your user by using the face detection feature (Selfie camera with smart capture). If the user exceeds the time set in your process to capture the photo, you can display a customizable message or instruction to the user. The default value is 40 seconds, and the minimum value is also 40 seconds.
onSystemChangedTypeCameraTimeoutFaceInference()
This method is invoked as soon as the maximum time for detecting a user's face is reached (without detecting anything). In this case, the camera mode is automatically switched to manual capture mode (without the smart capture silhouette).
The maximum capture time when using face detection (Selfie camera with smart capture) is 13 seconds. If the user encounters difficulty capturing the photo via face detection and exceeds the time set in your process, the capture mode is automatically switched to manual, aiming to make the action easier for the user (TimeoutToFaceInference)..
All the methods above must be created as indicated in your project (even if without any logic). Otherwise, the project will not compile successfully.
The camera opening method needs to know what to do when it successfully captures an image or encounters an error during the process. "What to do" is communicated to the camera opening method by implementing listeners that are called in cases of success or error.
Through the implementation of the listeners, you can specify what happens in your app in case of error (onErrorDocument method) or success (onSuccessDocument method) when capturing images.
onSucessDocument MethodWhen successfully capturing an image, this method is invoked and returns an object of type ResultCamera, which is later used in the REST API requests:
public void onSuccessDocument(ResultCamera resultCamera) { }The ResultCamera object returns 2 attributes: base64 and encrypted:
The base64 attribute can be used if you want to display a preview of the image in your app;
Both the encrypted and base64 attributes can be sent in the REST API calls to by Client.
If it is necessary to convert the base64 string to a bitmap, the standard method does not work for Android. You need to perform a split at the comma (,) for it to function correctly. If you want to learn more, read the article: How to convert a Base64 string into a Bitmap image to show it in a ImageView?.
onErrorDocument MethodIf an error occurs during the image capture, this method is invoked and returns an object of type UnicoError:
public void onErrorDocument(UnicoError error) { }To open the camera, the openCameraDocument() method is used. This method is provided through the object generated with an instance of the UnicoCheck class.
This method takes the following parameters:
A JSON file with the credentials, generated in the credential setup step;
The listeners configured above;
The type of document to be captured, which can be:
DocumentCameraTypes.CPF
Capture the front of the CPF
DocumentCameraTypes.CNH
Capture the open CNH
DocumentCameraTypes.CNH_FRENTE
Capture the front of the CNH
DocumentCameraTypes.CNH_VERSO
Capture the back of the CNH
DocumentCameraTypes.RG_FRENTE
Capture the front of the RG
DocumentCameraTypes.RG_VERSO
Capture the back of the RG RG
DocumentCameraTypes.OUTROS("descrição")
Capture any other document
If you need to capture a document that doesn't have a specific frame (e.g., RNE, among others), use the frame DocumentCameraTypes.OUTROS("description"), which will provide a generic, rectangular frame that can be used to guide any capture.
Example using the open CNH:
 _unicoCheck.build().openCameraDocument(
        jsonFileName: androidJsonFileName,
        documentType: DocumentType.CNH,
listener: this);Capturing the images is only the first part of the journey. After capturing the image, it is necessary to send the base64 generated by the SDK to the REST APIs of by Client. Learn more in the CreateProcess section of by Client.
Still need help?
Didn't find something or still need help? If you're already a client or partner, you can reach out through our Help Center.
In this section, you will find solutions to some common issues encountered during the integration of the Unico IDCloud SDK into your Flutter applications
The obfuscation material is intended to assist developers in overcoming obfuscation issues in their app.
The client's obfuscator may affect the functionality of the SDK, and it is necessary to ensure that it does not obfuscate the SDK code.
Unico disclaims any responsibility for obfuscation conflicts with the SDK.
Obfuscation is a process of transforming bytecode into a form that is less readable by humans, thus making reverse engineering more difficult.
This process involves removing debugging-related information such as variable tables, line numbers, and renaming packages, classes, and methods.
When embedding the Android SDK into the application, failures may occur.
When obfuscation is performed using DexGuard, if a failure occurs, use the following rules:
-keep class kotlin.coroutines.**
-keep class kotlinx.coroutines.**

-keep class com.facetec.sdk.** { *; }
-keep class com.acesso.acessobio_android.** { *; }
-keep class io.unico.** { *; }

-keep class br.com.makrosystems.haven.** { *; }
-keep class HavenSDK.**{ *; }
-keep class HavenSDK** { *; }When obfuscation is performed using ProGuard, if a failure occurs, use the following rules:
-keep class kotlin.coroutines.**
-keep class kotlinx.coroutines.**

-keep class com.facetec.sdk.** { *; }
-keep class com.acesso.acessobio_android.** { *; }
-keep class io.unico.** { *; }

-keep class br.com.makrosystems.haven.** { *; }
-keep class HavenSDK.**{ *; }
-keep class HavenSDK** { *; }After the official release of Xcode 16 on September 17, 2024, and its use for app distribution on the AppStore, we noticed a block when using the iOS SDK that signaled the use of Bitcode in two internal dependencies when using Cocoapods as the dependency manager. These dependencies are DeviceProfiling and UnicoSdkLogger. To avoid blocking new releases, you can follow the steps below until a permanent fix is included in a future iOS SDK release:
Open the Podfile.
Insert the following lines after the post_install do |installer| command and before the last end:
bitcode_strip_path = `xcrun --find bitcode_strip`.chop!
  def strip_bitcode_from_framework(bitcode_strip_path, framework_relative_path)
    framework_path = File.join(Dir.pwd, framework_relative_path)
    command = "#{bitcode_strip_path} #{framework_path} -r -o #{framework_path}"
    puts "Stripping bitcode: #{command}"
    system(command)
  end

  framework_paths = [
    "Pods/unicocheck-ios/DeviceProfiling.xcframework/ios-arm64/DeviceProfiling.framework/DeviceProfiling",
    "Pods/unicocheck-ios/UnicoSdkLogger.xcframework/ios-arm64/UnicoSdkLogger.framework/UnicoSdkLogger"
  ]

  framework_paths.each do |framework_relative_path|
    strip_bitcode_from_framework(bitcode_strip_path, framework_relative_path)
  end
2.1. If there is already some code, insert it before the existing section;
2.2. If Bitcode has already been removed manually, add the paths explicitly mentioned in framework_paths.;
If the post_install do |installer| command is not present in the Podfile, insert it as follows before the last end:
post_install do |installer|
bitcode_strip_path = `xcrun --find bitcode_strip`.chop!
  def strip_bitcode_from_framework(bitcode_strip_path, framework_relative_path)
    framework_path = File.join(Dir.pwd, framework_relative_path)
    command = "#{bitcode_strip_path} #{framework_path} -r -o #{framework_path}"
    puts "Stripping bitcode: #{command}"
    system(command)
  end

  framework_paths = [
    "Pods/unicocheck-ios/DeviceProfiling.xcframework/ios-arm64/DeviceProfiling.framework/DeviceProfiling",
    "Pods/unicocheck-ios/UnicoSdkLogger.xcframework/ios-arm64/UnicoSdkLogger.framework/UnicoSdkLogger"
  ]

  framework_paths.each do |framework_relative_path|
    strip_bitcode_from_framework(bitcode_strip_path, framework_relative_path)
  end
Source: Bitrise, Xcode 16 release notes, Stackoverflow.
Still need help?
Didn't find something or still need help? If you're already a client or partner, you can reach out through our Help Center.
In this section, you will find all the information needed to install the Unico IDCloud platform SDK in your Flutter applications
Your development environment must meet the following prerequisites:
Have the Flutter Developer SDK installed.
iOS: It is compatible with almost all devices running iOS 11.
You can check the list of compatible devices on Apple’s official support channels.
It is compatible with the vast majority of devices running Android 5.0 (API level 21) or higher.
The following table lists the devices tested in the lab, along with the availability of vendor/manufacturer extensions. Some extensions listed may be subject to specific manufacturer APIs or SKUs. Click below to see the tested devices:
ASUS - X01BDA
10.0.0
Físico
ASUS - Z01KD
8.0.1
Físico
HUAWEY - P30 Lite
9.0.0
Físico
LG - K22
10.0.0
Físico
LG - Q6
7.0.0
Físico
MOTOROLA - Moto one macro
10.0.0
Físico
MOTOROLA - Moto G4
6.0.1
Físico
MOTOROLA - Moto G5s Plus
8.1.0
Físico
MOTOROLA - Moto G6 Play
9.0.0
Físico
MOTOROLA - Moto G7 Play
10.0.0
Físico
MOTOROLA - Moto G7 Power
10.0.0
Físico
MOTOROLA - Moto G8 Power Lite
10.0.0
Físico
SAMSUNG - A01
10.0.0
Físico
SAMSUNG - J8 SM J810M
8.1.0
Físico
SAMSUNG - Galaxy A30s SM-A307GT
10.0.0
Físico
SAMSUNG - Galaxy A51
10.0.0
Físico
SAMSUNG - Galaxy A71
11.0.0
Físico
SAMSUNG - Galaxy S20+
11.0.0
Físico
SAMSUNG - s10e
11.0.0
Físico
XIAOMI - Mi 8 Lite
9.0.0
Físico
XIAOMI - Mi 8 Lite
10.0.0
Físico
XIAOMI - Poco X3
10.0.0
Físico
XIAOMI - Redmi Note 8
10.0.0
Físico
XIAOMI - Redmi Note 8 Pro
10.0.0
Físico
XIAOMI - Redmi Note 9
10.0.0
Físico
XIAOMI - Redmi Note 9 Pro
10.0.0
Físico
GOOGLE - Pixel sailfish
8.0.0
Virtual (TestLab)
HUAWEY - ALE L23
5.0.0
Virtual (TestLab)
HUAWEY - ANE LX1
9.0.0
Virtual (TestLab)
HUAWEY - ANE LX2
9.0.0
Virtual (TestLab)
HUAWEY - COR L29
8.1.0
Virtual (TestLab)
HUAWEY - MHA L29
7.0.0
Virtual (TestLab)
HUAWEY - NEO L29
9.0.0
Virtual (TestLab)
SAMSUNG - SC 02J
8.0.0
Virtual (TestLab)
SAMSUNG - SM G891A
9.0.0
Virtual (TestLab)
SAMSUNG - SM G930AZ
8.0.0
Virtual (TestLab)
SAMSUNG - SM G935A
8.0.0
Virtual (TestLab)
SAMSUNG - SM G965N
9.0.0
Virtual (TestLab)
SAMSUNG - SM G965U1
8.0.0
Virtual (TestLab)
SAMSUNG - SM G981U1
10.0.0
Virtual (TestLab)
SAMSUNG - SM J727V
8.1.0
Virtual (TestLab)
SAMSUNG - SM N950F
9.0.0
Virtual (TestLab)
SAMSUNG - SM N950N
9.0.0
Virtual (TestLab)
SAMSUNG - SM N950U
8.0.0
Virtual (TestLab)
SAMSUNG - SM N960F
9.0.0
Virtual (TestLab)
SAMSUNG - SM N960N
9.0.0
Virtual (TestLab)
SAMSUNG - SM N960U1
8.1.0
stLab)
To implement the Flutter SDK from the Unico IDCloud platform into your Flutter app, follow the step-by-step guide listed below:
Contact the CSs and/or Onboarding team.
Request the SDK Key by providing the identifiers of your applications: Bundle Identifier for iOS, PackageID for Android, and Host for WEB.
The identifiers of your applications will be linked to the SDK Key by the Unico team.
You will receive your SDK Key to implement the AcessoBioConfigDataSource.
To embed the SDK Key into the project, implement the AcessoBioConfigDataSource protocol in your class:
  final _configIos = UnicoConfig(
      getBundleIdentifier: "Your BundleIdentifier Ios",
      getHostKey: "Your HostKey Ios");

  final _configAndroid = UnicoConfig(
      getBundleIdentifier: "Your BundleIdentifier Android",
      getHostKey: "Your HostKey Android");

  void initUnicoCamera() {
    _unicoCheck = new UnicoCheck(
        listener: this,
        unicoConfigIos: _configIos,
        unicoConfigAndroid: _configAndroid);
}Done. After completing the SDK installation, proceed to the implementation by reading the following Usage and Integration Guide.
Still need help?
Didn't find something or still need help? If you're already a client or partner, you can reach out through our Help Center.


In this section, you will find all the information necessary for customizing the SDK of the Unico IDCloud platform in your Flutter applications
The Flutter SDK allows for some customizations to be made. Below are all the possible customizations for this SDK.
It is possible to configure the experience of the informational messages in the capture frames by changing their language. Use the enumerated type LocaleTypes, which contains the following values:
LocaleTypes.PT_BR: for Portuguese(Brazil);
LocaleTypes.ES_MX: for Spanish(Mexico);
LocaleTypes.ES_ES: for Spanish(Spain);
LocaleTypes.EN_US: for English(USA).
See how to implement it in the example below:
unicoCheck.setLocale(LocaleTypes.EN_US);This is an optional step, but highly recommended to ensure that the capture process aligns with your company's visual identity.
It is possible to customize some objects of the frame according to the camera mode used, through the setTheme() method.
The supported types for color representation are either a Color Resource or a String containing the hexadecimal color code. For example: R.color.red or #FF0000.
All the methods are available below:
getColorSilhouetteError()
getColorSilhouetteNeutral()
getColorBackground()
getColorBoxMessage()
getColorTextMessage()
getColorBackgroundPopupError()
getColorBackgroundButtonPopupErrorgetColorTextPopupError()
getColorBackgroundButtonPopupError()
getColorTextButtonPopupError()
getColorBackgroundTakePictureButton()
getColorIconTakePictureButton()
getColorBackgroundBottomDocument()
getColorTextBottomDocument()
getColorProgressBar()
getColorCancelButtonIcon()
In the Android implementation, the customization of the colorCancelButtonIcon should be done by adding the desired color in the colors.xml resource file.
<resources>
    <color name="unico_color_button_cancel">YOUR COLOR</color>
</resources>
Still need help?
Didn't find something or still need help? If you're already a client or partner, you can reach out through our Help Center.