Android Customization
In this section, you will find all the information necessary for customizing the SDK of the Unico IDCloud platform in your Android applications
The Android SDK allows for some customizations. Below, you can see all the possible customizations for this SDK.
Customize Language
It is possible to configure the experience of the informational messages in the capture frames by changing their language. Use the enumerated type LocaleTypes, which contains the following values:
LocaleTypes.PT_BR: for Portuguese(Brazil);LocaleTypes.ES_MX: for Spanish(Mexico);LocaleTypes.ES_ES: for Spanish(Spain);LocaleTypes.EN_US: for English(USA).
See how to implement it in the example below:
unicoCheck.setLocale(LocaleTypes.EN_US);Customize Capture Process Experience
Customize Selfie Capture Experience
This is an optional step, but highly recommended so that the capture process reflects your company's visual identity.
It is possible to customize some objects of the frame according to the camera mode used, through the setTheme() method.
The supported types for color representation are Color Resource or String containing the hexadecimal color code. Example: R.color.red or #FF0000.
All methods are available below:
IAcessoBioTheme unicoTheme = new IAcessoBioTheme() {
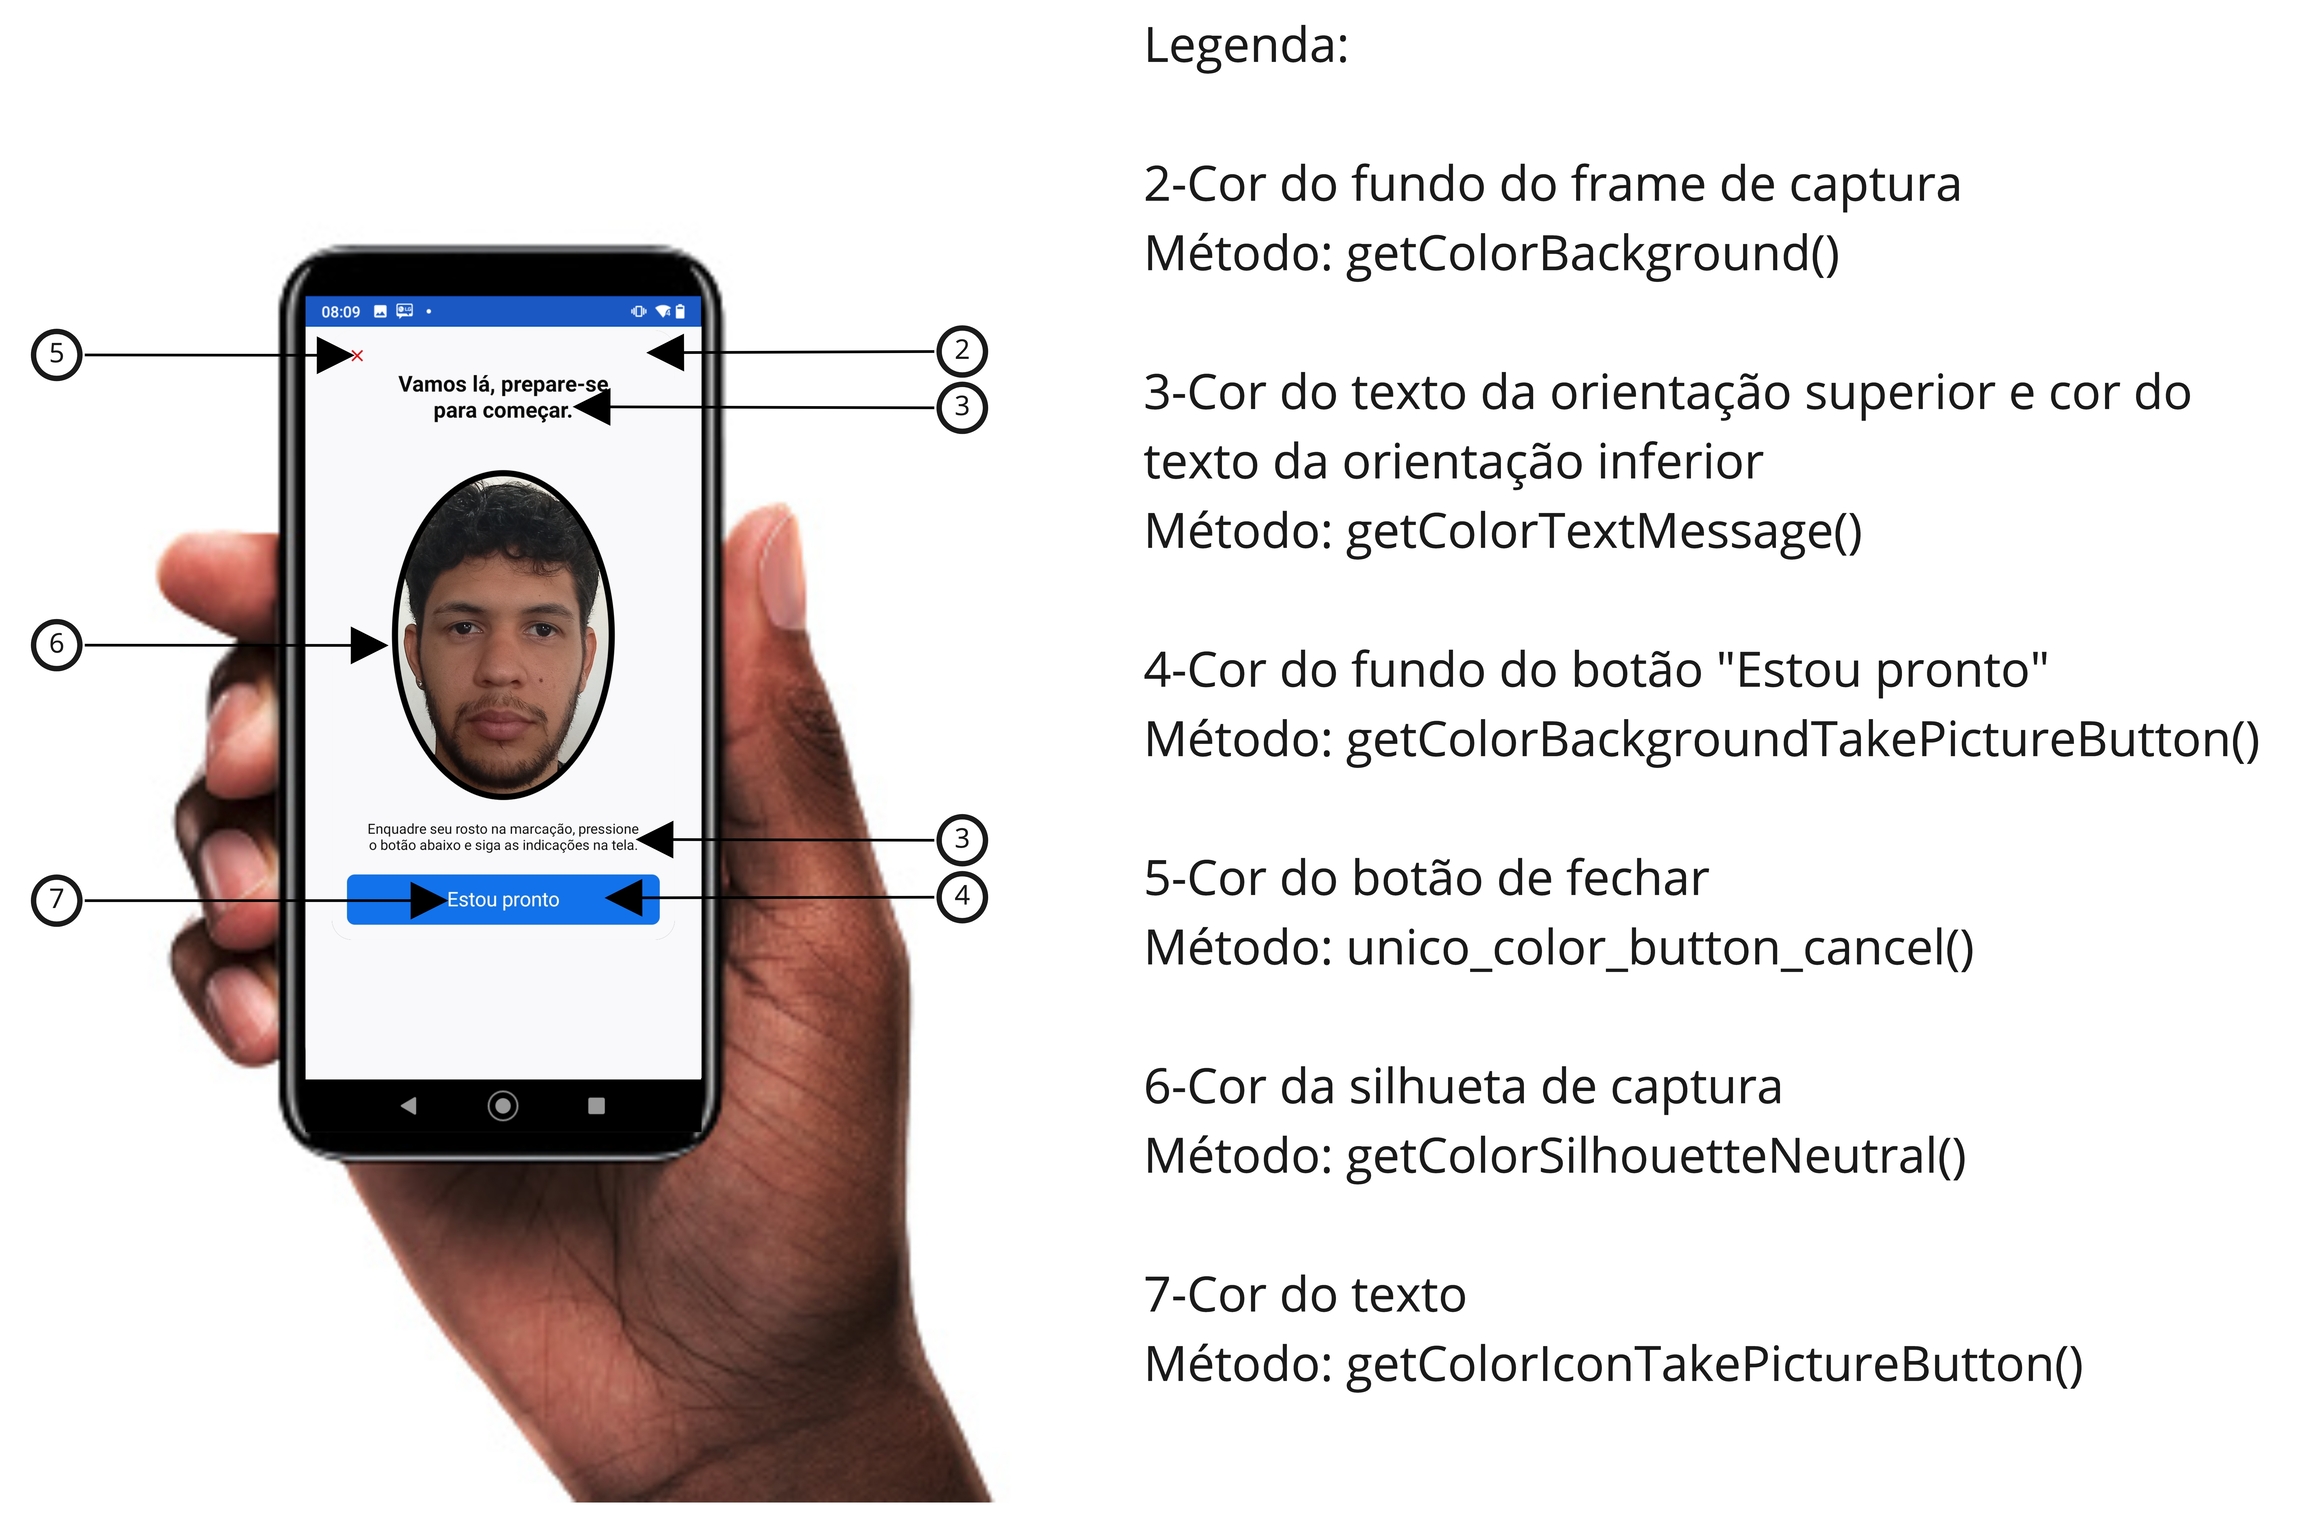
@Override
public Object getColorBackground() {
return R.color.your_color;
}
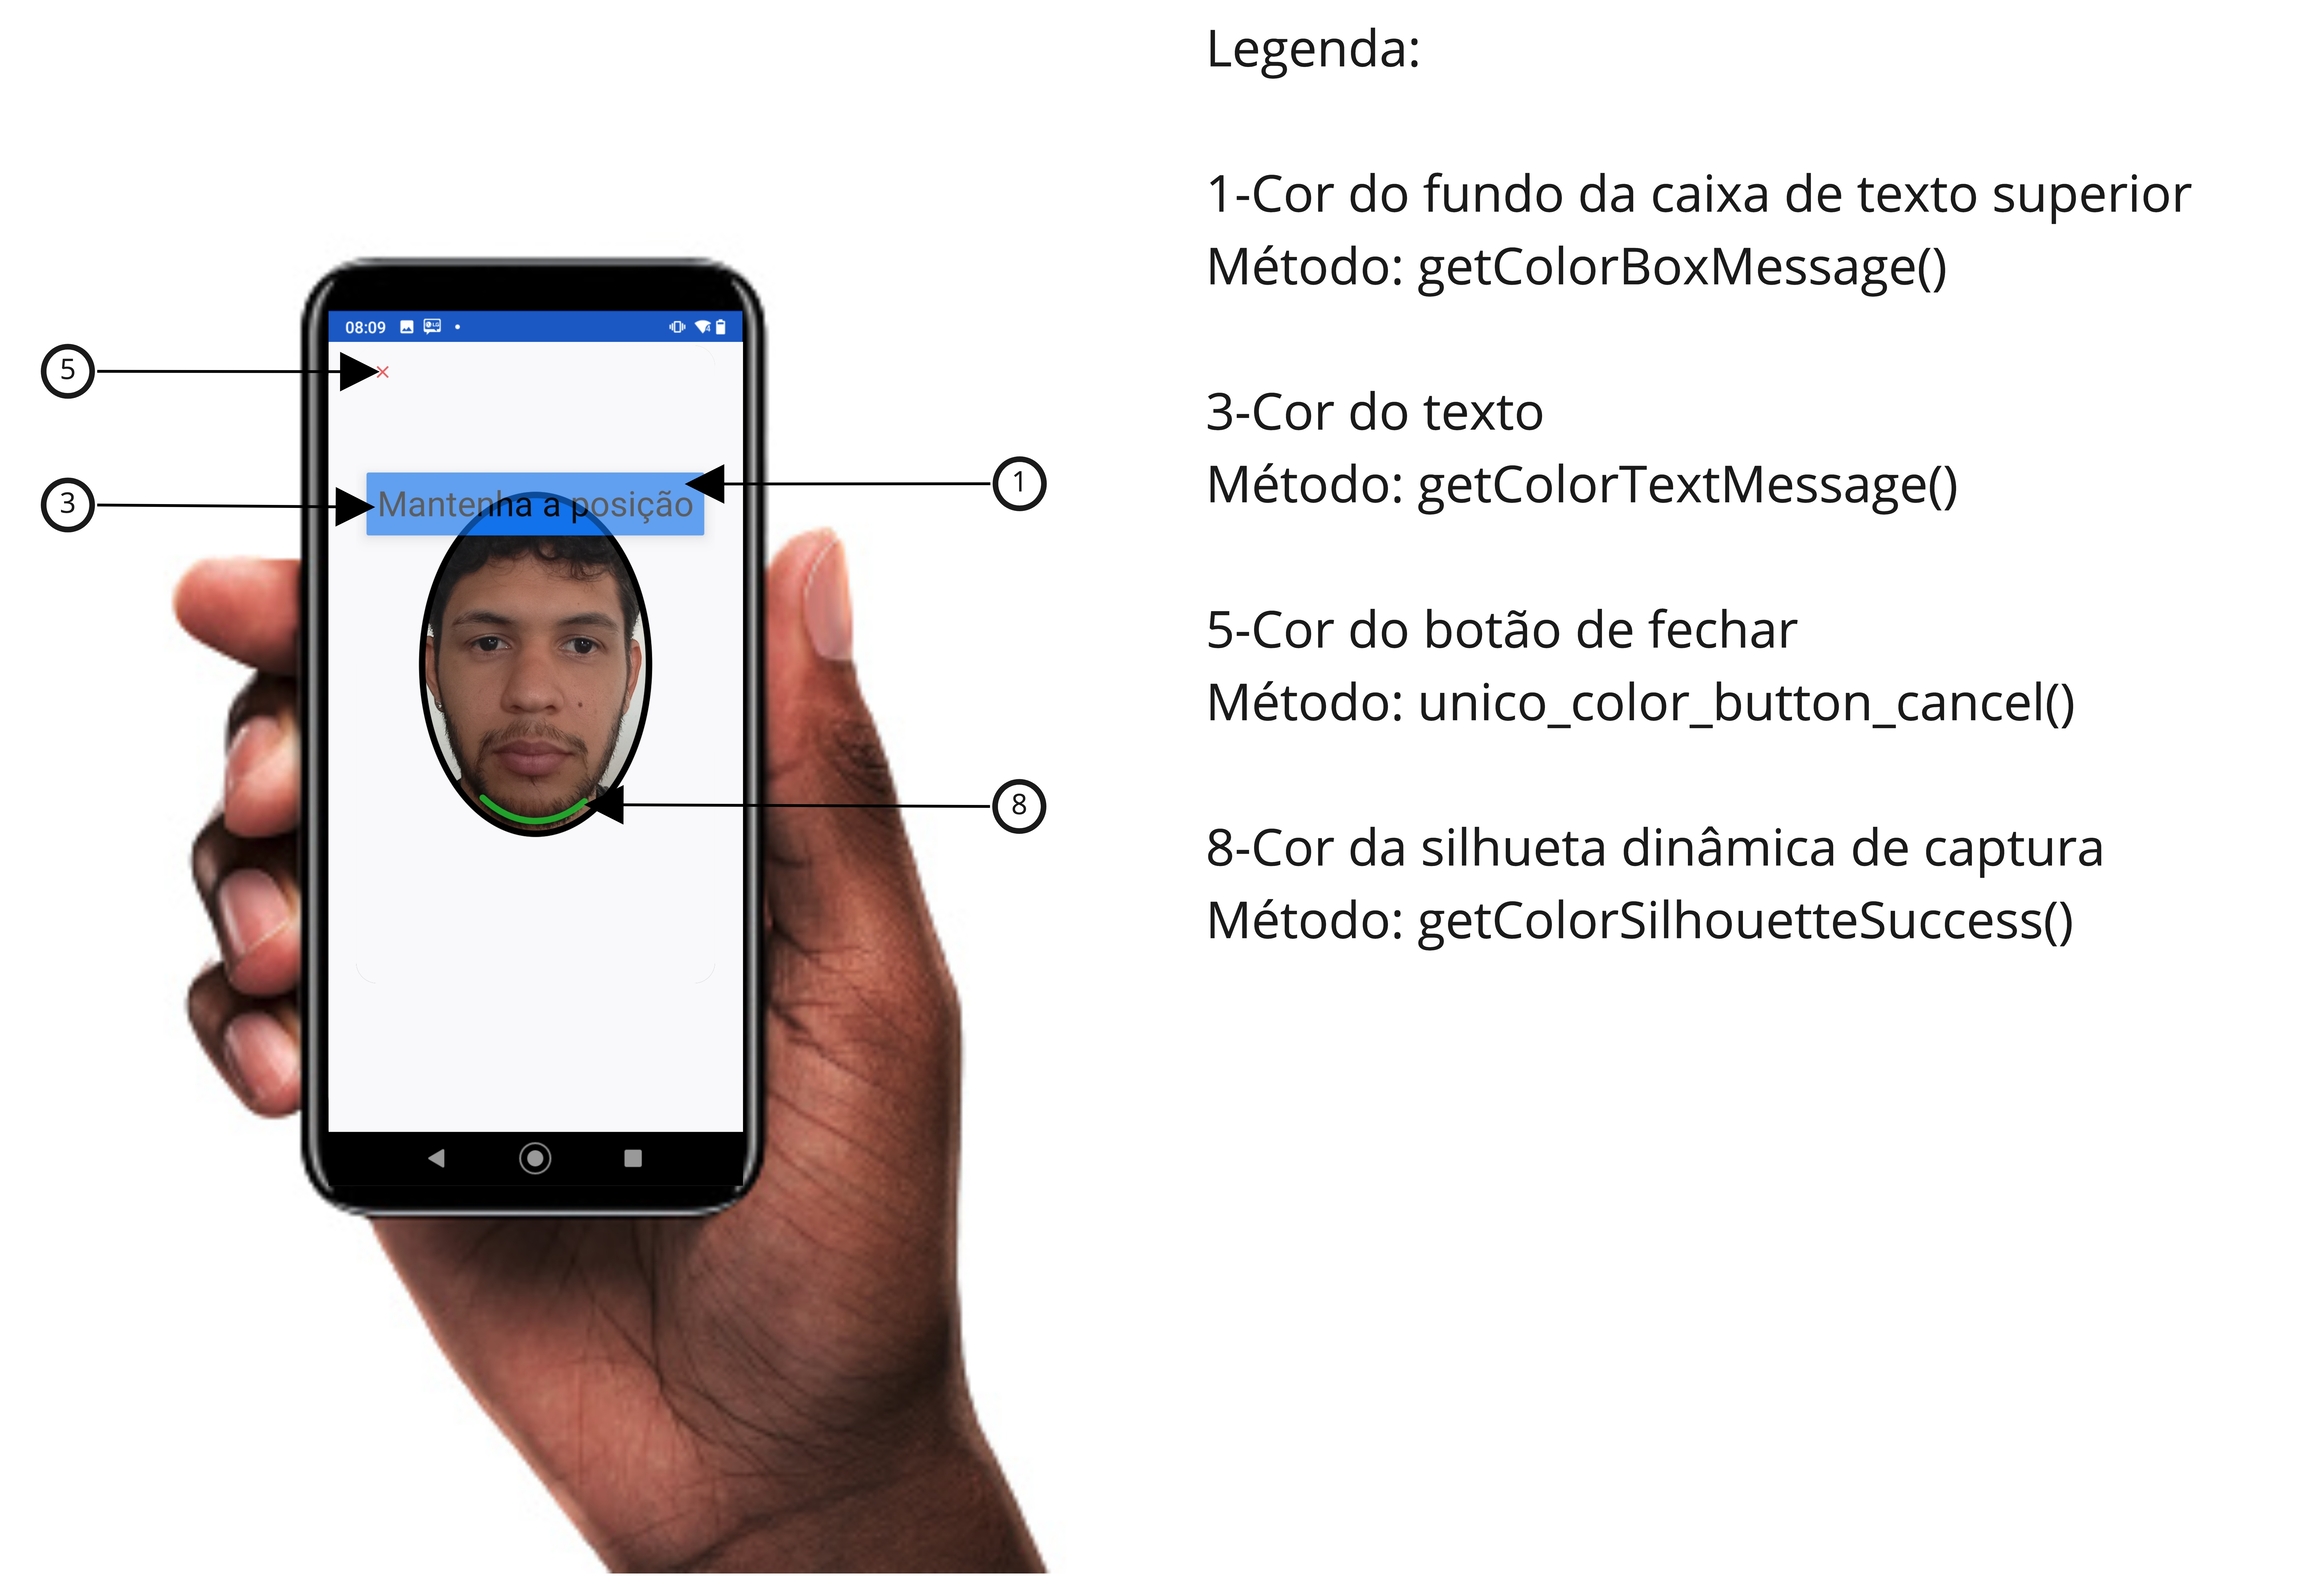
@Override
public Object getColorBoxMessage() {
return R.color.your_color;
}
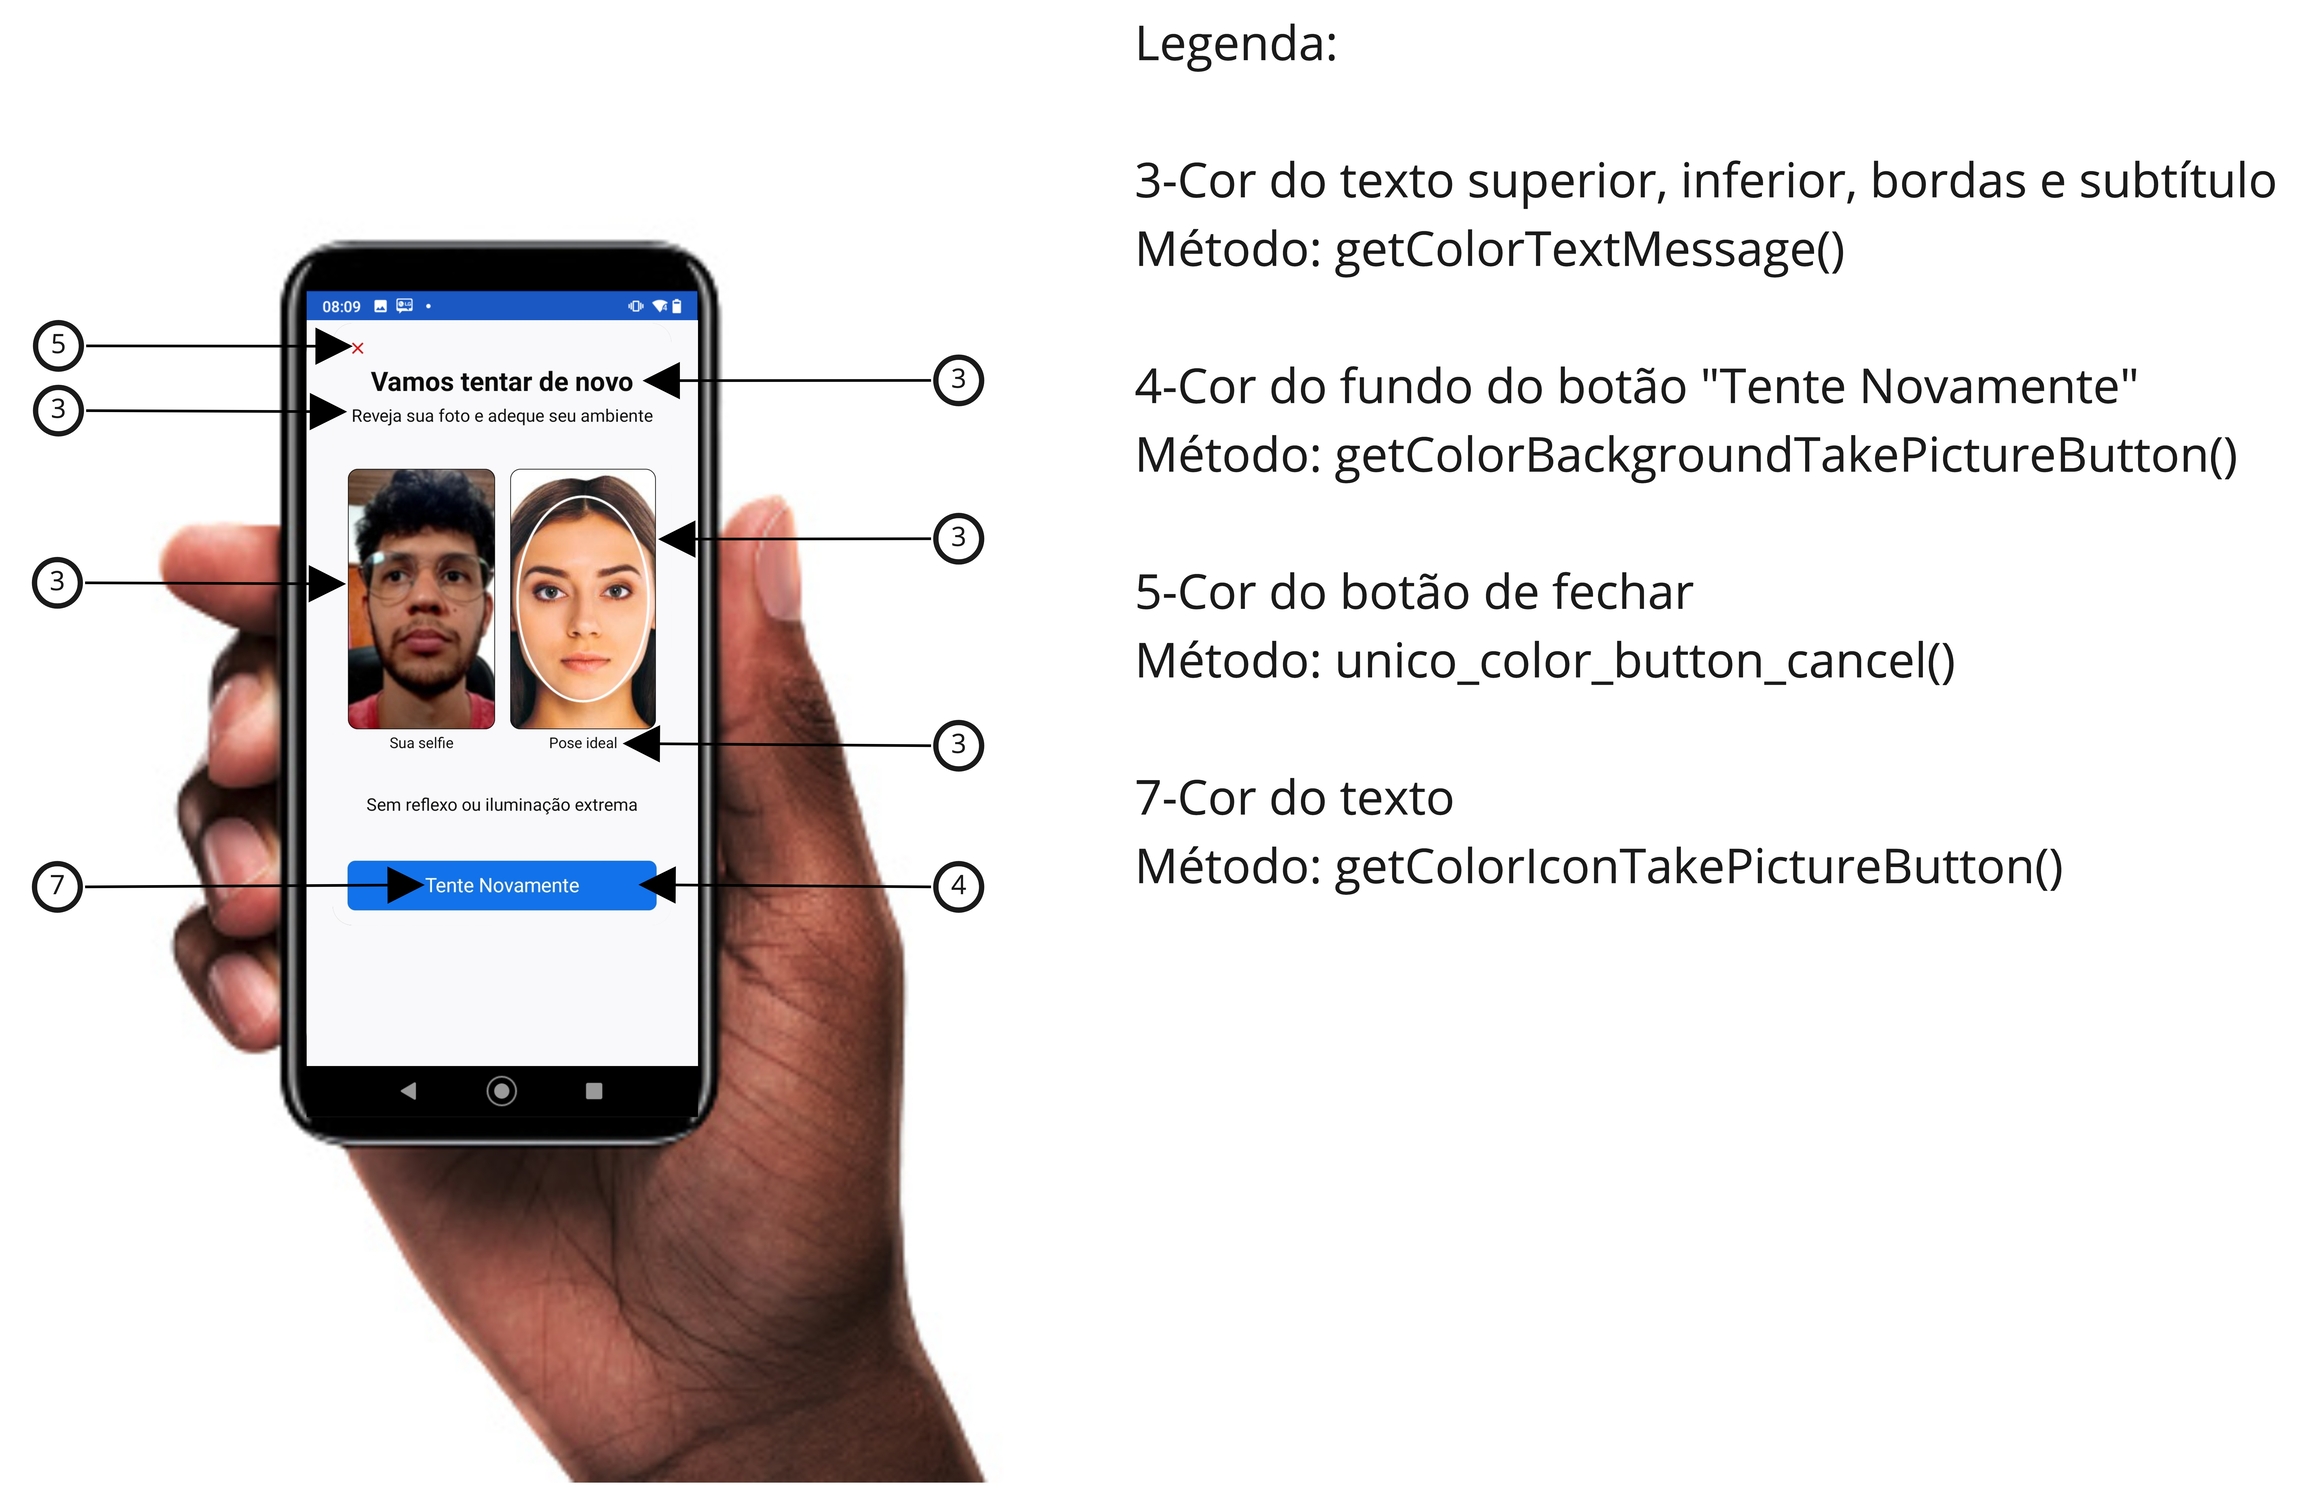
@Override
public Object getColorTextMessage() {
return R.color.your_color;
}
@Override
public Object getColorBackgroundPopupError() {
return R.color.your_color;
}
@Override
public Object getColorTextPopupError() {
return R.color.your_color;
}
@Override
public Object getColorBackgroundButtonPopupError() {
return R.color.your_color;
}
@Override
public Object getColorTextButtonPopupError() {
return R.color.your_color;
}
@Override
public Object getColorBackgroundTakePictureButton() {
return R.color.your_color;
}
@Override
public Object getColorIconTakePictureButton() {
return R.color.your_color;
}
@Override
public Object getColorBackgroundBottomDocument() {
return R.color.your_color;
}
@Override
public Object getColorTextBottomDocument() {
return R.color.your_color;
}
@Override
public Object getColorSilhouetteSuccess() {
return R.color.your_color;
}
@Override
public Object getColorSilhouetteError() {
return R.color.your_color;
}
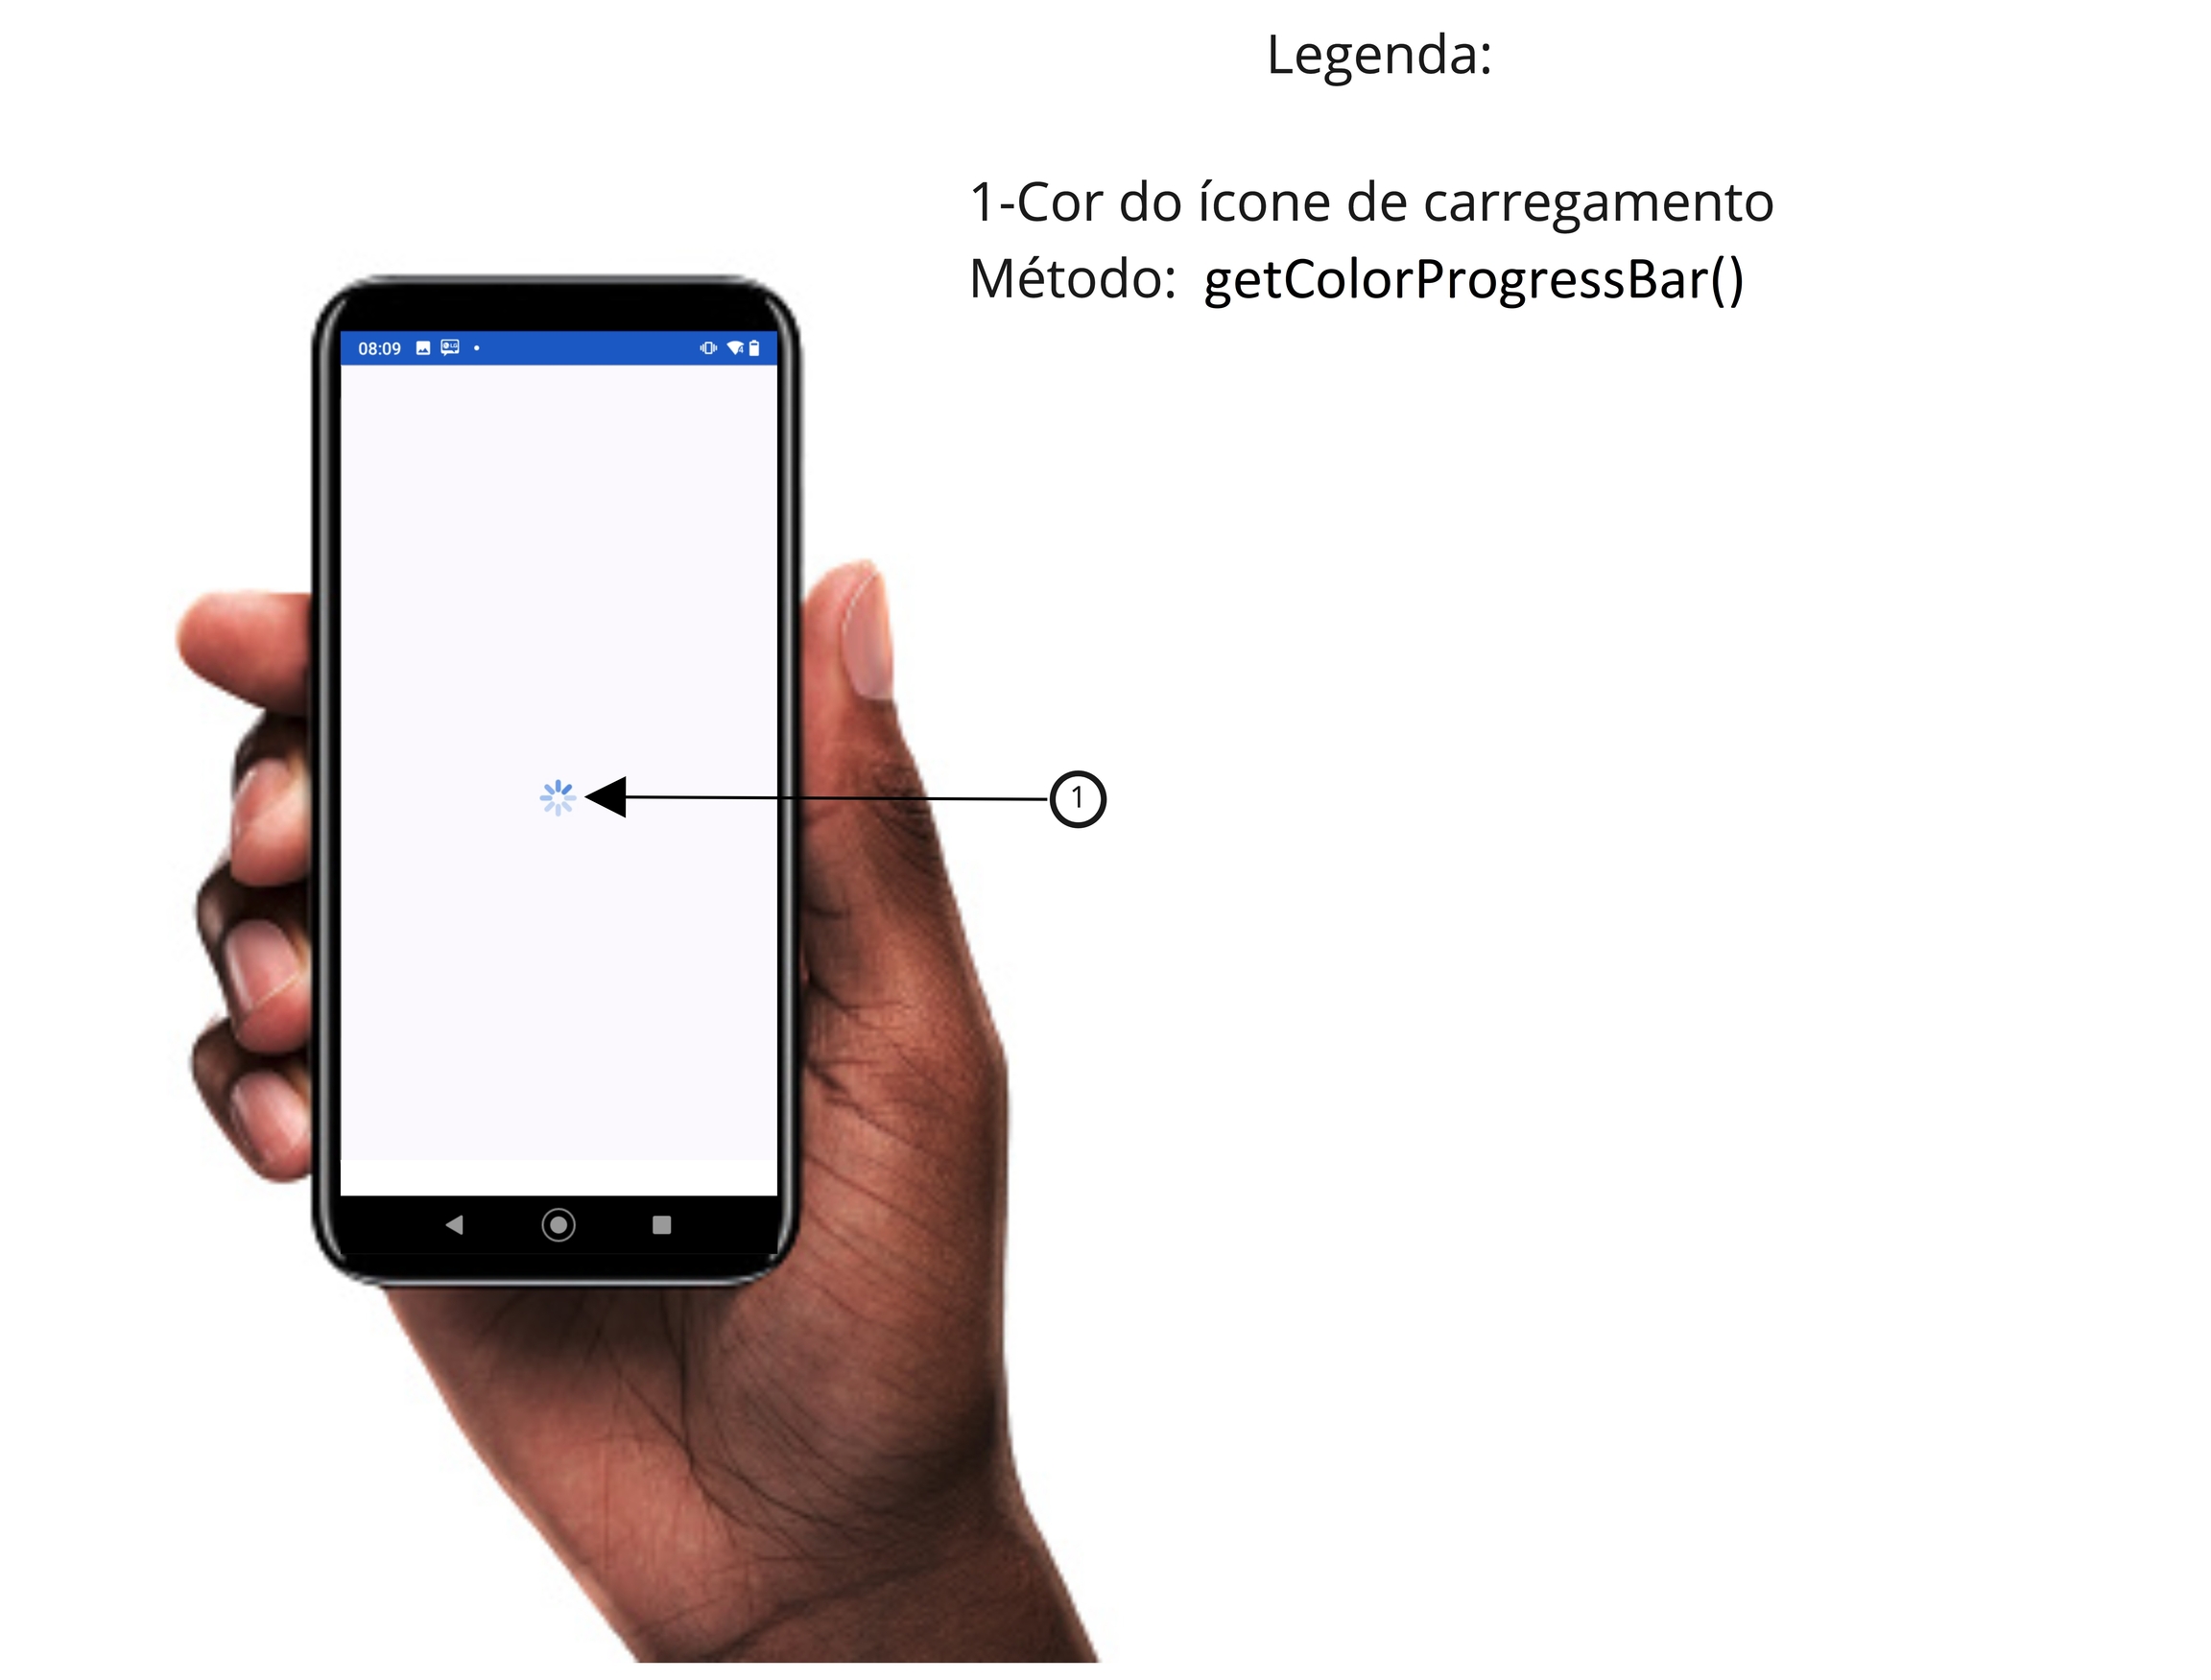
@Override
public Object getColorProgressBar() {
return R.color.your_color;
}
};
acessoBioBuilder.setTheme(unicoTheme); It is also possible to make static customizations. In your colors.xml file, add the following code:
<color name="unico_color_background"> #YourColor </color>
<color name="unico_color_silhouette_success"> #YourColor </color>
<color name="unico_color_silhouette_error"> #YourColor </color>
<color name="unico_color_silhouette_neutral"> #YourColor </color>
<color name="unico_color_box_message"> #YourColor </color>
<color name="unico_color_text_message"> #YourColor </color>
<color name="unico_color_background_popup_error"> #YourColor </color>
<color name="unico_color_text_popup_error"> #YourColor </color>
<color name="unico_color_background_button_popup_error"> #YourColor </color>
<color name="unico_color_text_button_popup_error"> #YourColor </color>
<color name="unico_color_background_take_picture_button"> #YourColor </color>
<color name="unico_color_icon_take_picture_button"> #YourColor </color>
<color name="unico_color_background_bottom_document"> #YourColor </color>
<color name="unico_color_text_bottom_document"> #YourColor </color>
<color name="unico_color_button_cancel"> #YourColor </color>
<color name="unico_color_progress_bar_capture"> #YourColor </color>
Below, check the field specification for the customization:
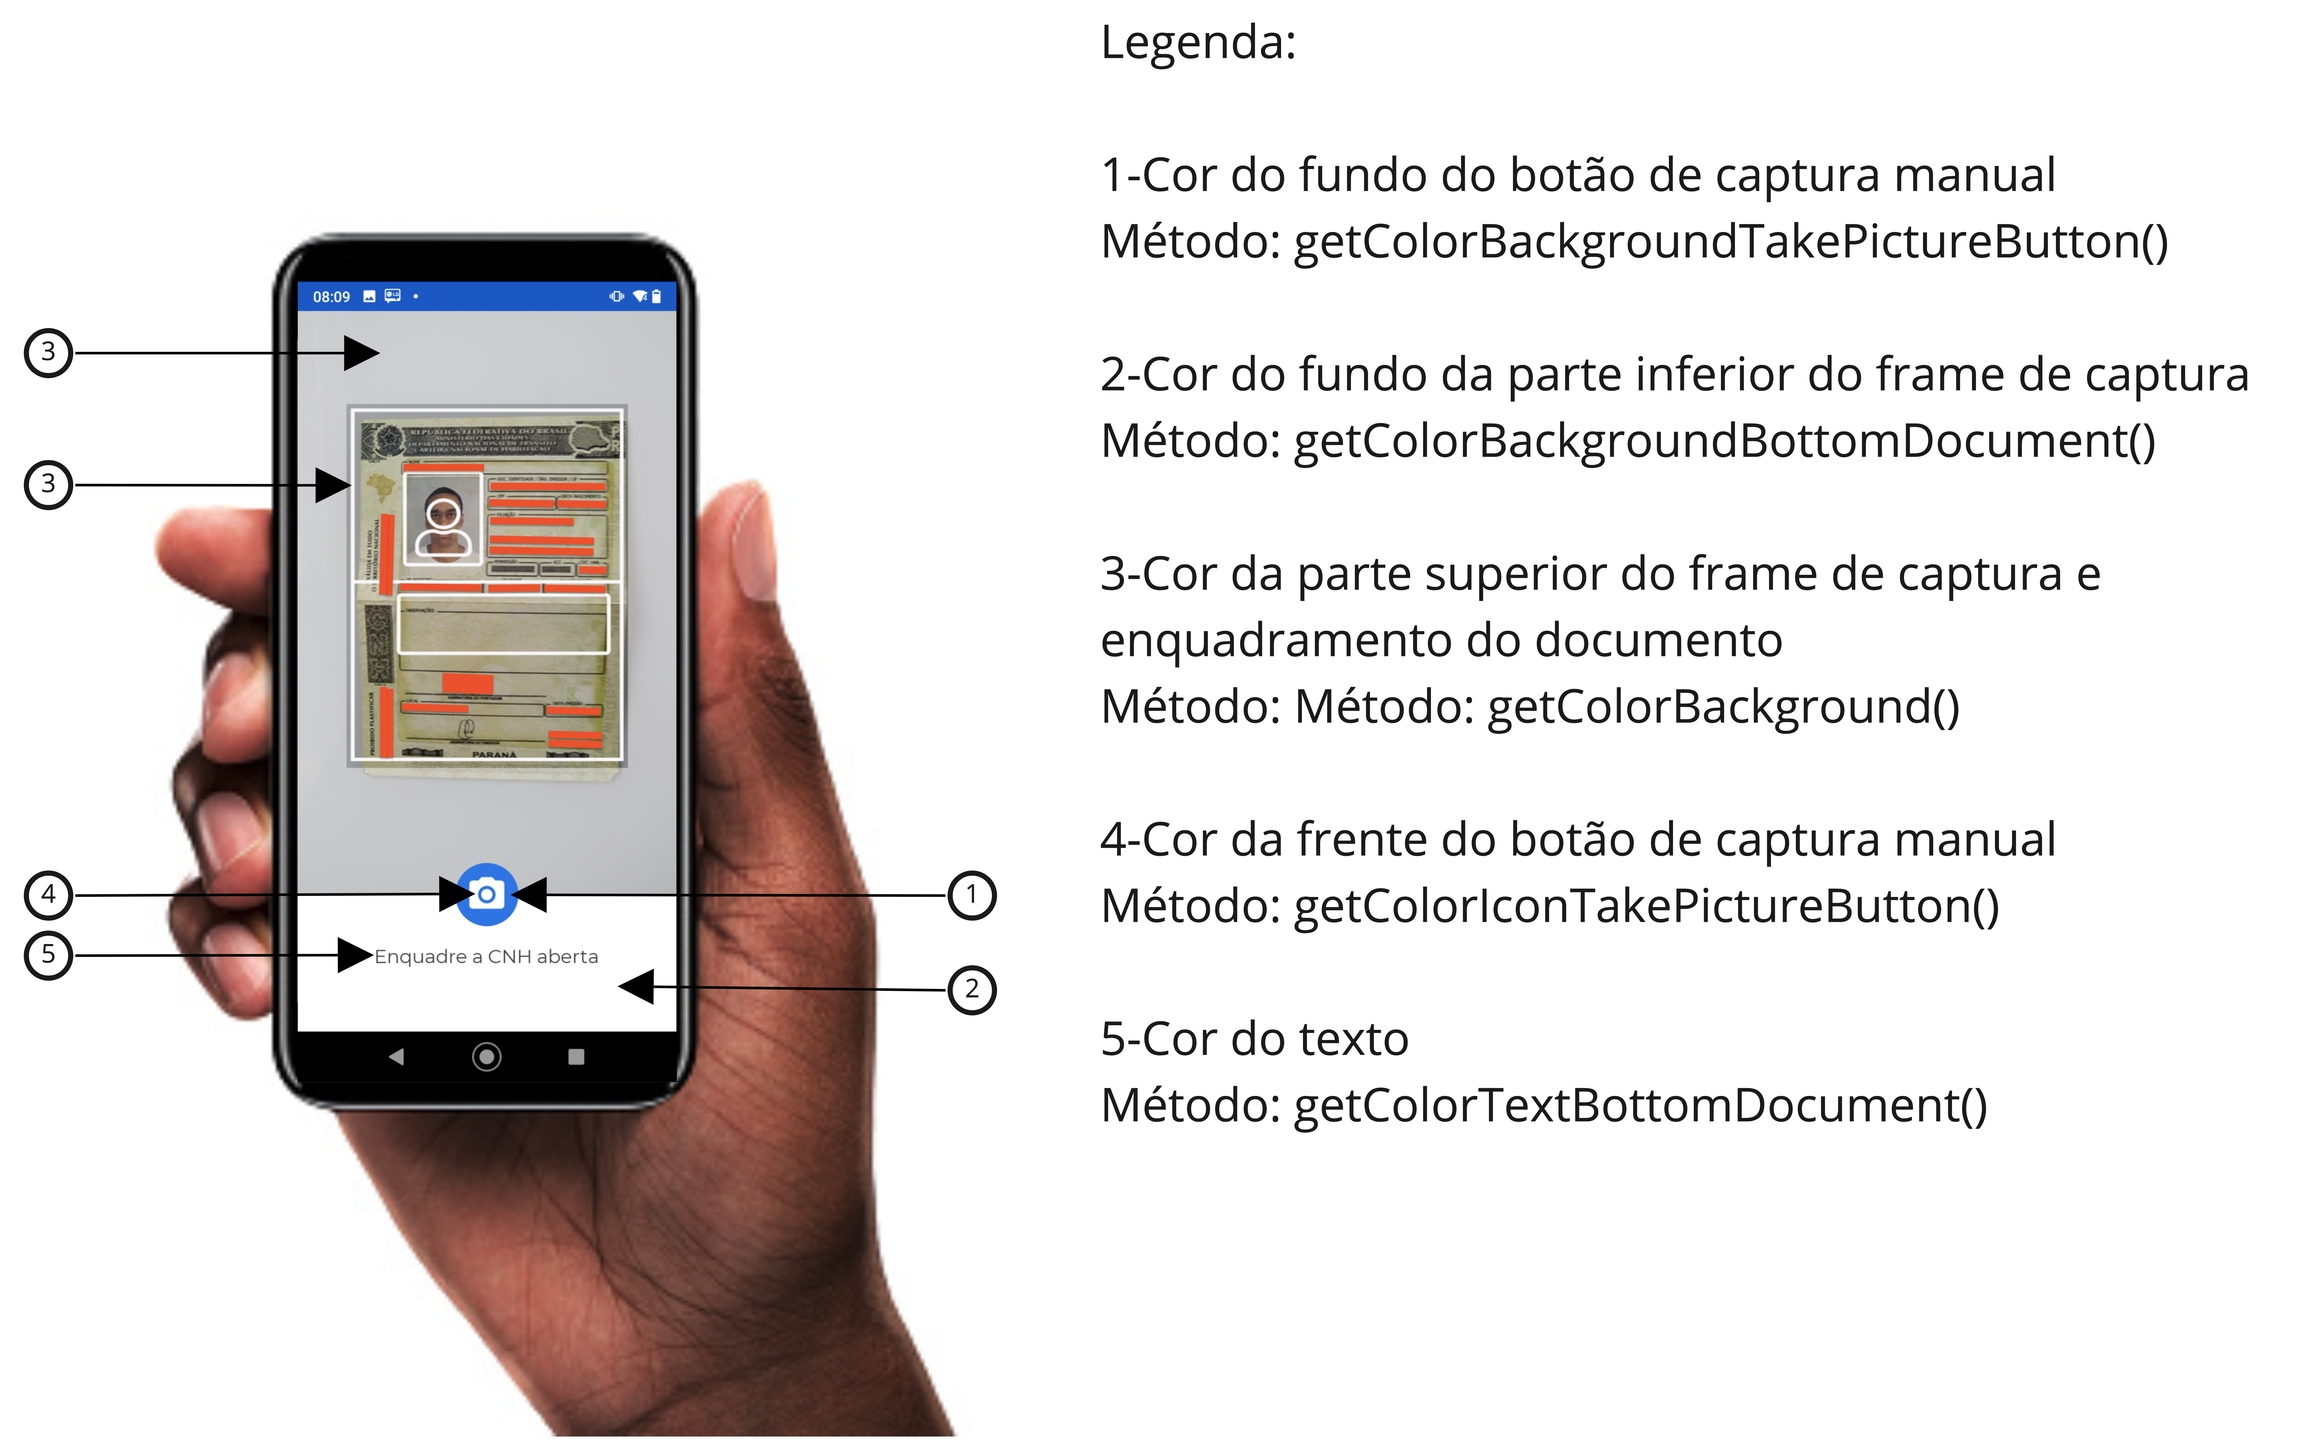
Customize Document Capture Experience
This is an optional step, but highly recommended so that the capture process reflects your company's visual identity.
It is possible to customize some objects of the frame according to the camera mode used, through the setTheme() method.
The supported types for color representation are Color Resource or String containing the hexadecimal color code. For example: R.color.red or #FF0000.
All methods are available below:
IAcessoBioTheme unicoTheme = new IAcessoBioTheme() {
    @Override
    public Object getColorBackground() {
        return R.color.your_color;
    }
    @Override
    public Object getColorBoxMessage() {
        return R.color.your_color;
    }
    @Override
    public Object getColorTextMessage() {
        return R.color.your_color;
    }
    @Override
    public Object getColorBackgroundPopupError() {
        return R.color.your_color;
    }
    @Override
    public Object getColorTextPopupError() {
        return R.color.your_color;
    }
    @Override
    public Object getColorBackgroundButtonPopupError() {
        return R.color.your_color;
    }
    @Override
    public Object getColorTextButtonPopupError() {
        return R.color.your_color;
    }
    @Override
    public Object getColorBackgroundTakePictureButton() {
        return R.color.your_color;
    }
    @Override
    public Object getColorIconTakePictureButton() {
        return R.color.your_color;
    }
    @Override
    public Object getColorBackgroundBottomDocument() {
        return R.color.your_color;
    }
    @Override
    public Object getColorTextBottomDocument() {
        return R.color.your_color;
    }
    @Override
    public Object getColorSilhouetteSuccess() {
        return R.color.your_color;
    }
    @Override
    public Object getColorSilhouetteError() {
        return R.color.your_color;
    }

    @Override
    public Object getColorProgressBar() {
        return R.color.your_color;
    }
};

acessoBioBuilder.setTheme(unicoTheme); It is also possible to make static customizations. In your colors.xml file, add the following code:
<color name="unico_color_background"> #YourColor </color>
<color name="unico_color_silhouette_success"> #YourColor </color>
<color name="unico_color_silhouette_error"> #YourColor </color>
<color name="unico_color_silhouette_neutral"> #YourColor </color>
<color name="unico_color_box_message"> #YourColor </color>
<color name="unico_color_text_message"> #YourColor </color>
<color name="unico_color_background_popup_error"> #YourColor
<color name="unico_color_text_popup_error"> #YourColor </color>
<color name="unico_color_background_button_popup_error"> #YourColor
<color name="unico_color_text_button_popup_error"> #YourColor </color>
<color name="unico_color_background_take_picture_button"> #YourColor </color>
<color name="unico_color_icon_take_picture_button"> #YourColor </color>
<color name="unico_color_background_bottom_document"> #YourColor </color>
<color name="unico_color_text_bottom_document"> #YourColor </color>
<color name="unico_color_button_cancel"> #YourColor </color>
<color name="unico_color_progress_bar_capture"> #YourColor </color>
Below, check the specification of the customization fields:
Still need help?
Didn't find something or still need help? If you're already a client or partner, you can reach out through our Help Center.
Last updated