Selfie Capture
In this section, you will find all the necessary information for using and integrating the Unico IDCloud platform SDK into your Web applications for selfie capture
This guide has been designed to help you quickly and easily implement the Web SDK. Below, you'll find the step-by-step process for the complete integration. If you wish to customize the experience further, check out the Web Customization section.
Initializing the SDK
To get started, follow these 3 simple steps in your project:
Instantiate a new Builder:
const unicoCameraBuilder = new UnicoCheckBuilder();Specify the path of the additional files (if added to your project):
unicoCameraBuilder.setResourceDirectory("/resources");Specify the path of the AI model files, if using the Intelligent Camera feature.
unicoCameraBuilder.setModelsPath("https://meusite.com.br/models");Environment Configuration
It is possible to configure the environment to be used when running the SDK. Use the enumerated SDKEnvironmentTypes, which contains the following enumerations:
SDKEnvironmentTypes.PROD: for the Production environment;SDKEnvironmentTypes.UAT: for the Staging environment.
Here is an example of how to implement it:
import {
  ...
  UnicoCheckBuilder,
  SDKEnvironmentTypes
  ...
} from "unico-webframe"

unicoCameraBuilder.setEnvironment(SDKEnvironmentTypes.UAT);
Implementing the Callback Functions
One of the objects that should be passed as a parameter to the method responsible for rendering the capture frame is the callback object. This object should contain callback functions for success and error cases, as exemplified below.
  const callback = {
    on: {
      success: (obj) => {
        console.log(obj.base64);
        console.log(obj.encrypted);
      },
      error: (error) => {
        console.error(error)
        //confira na aba "Referências" sobre os erros possíveis
      }
    }
  };
This object is mandatory, and if it is not correctly implemented (covering all success or error events), it will generate an exception, which, if not handled, will be displayed in the user's console.
The
encryptedattribute is strictly intended for sending the image through the by Client APIs. This attribute should not be opened or serialized, as its characteristics may be altered without prior notice. Its use should be exclusive in interactions with the APIs to ensure the integrity and security of the data. Unico is not responsible for any damage resulting from this practice, as modifications may occur unexpectedly.The
base64/encryptedfiles may vary in size depending on several variables, including the quality of the devices and the photos generated by them, and Unico's business rules. To avoid issues in your application, do not limit the size of the string generated by the SDK for these files in your programming logic or infrastructure.
Configure and Start
To start the camera with the settings made so far, you need to create an instance of the builder using the build() method.
const unicoCamera = unicoCameraBuilder.build();Then, with the camera "assembled", you need to configure the camera's capture mode.
The camera preparation will be done using the prepareSelfieCamera() method, provided by the builder. This method takes 2 parameters:
The UnicoConfig class obtained in this step;
The desired camera mode, which can be one of the following:
SelfieCameraTypes.NORMALfor the normal camera mode;SelfieCameraTypes.SMARTfor the smart camera mode.
This method returns a promise, which, when resolved, returns an object used to effectively open the camera via the open method. The open method takes as parameters the callback functions configured in the previous step.
If you wish to use automatic capture, pass the parameter Unico.SelfieCameraTypes.SMART to the prepareSelfieCamera method.
For smart capture, the computer vision models should also be loaded through the setModelsPath method, as explained in the first step of this guide.
Using the UnicoConfig class:
const config = new UnicoConfig()
  .setHostname("<YOUR_HOSTNAME>")
  .setHostKey("<YOUR_HOST_KEY>");

  unicoCamera.prepareSelfieCamera(
    config,
    SelfieCameraTypes.SMART
  ).then(cameraOpener => {
    cameraOpener.open(callback);
  }).catch(error => {
    console.error(error);
    // confira na aba "Referências" sobre os erros possíveis
  });
Configure Capture Mode in iFrames
It is possible to use the Web SDK with embedded Interactive Liveness in an iFrame. To do this, you need to implement a process similar to the previous section when preparing the camera.
The camera preparation will be done through the method prepareSelfieCameraForIFrame(), also provided by the builder. This method takes the same parameters as prepareSelfieCamera():
const unicoCamera = unicoCameraBuilder.build();

const config = new UnicoConfig()
  .setHostname("<YOUR_HOSTNAME>")
  .setHostKey("<YOUR_HOST_KEY>");

  unicoCamera.prepareSelfieCameraForIFrame(
    config,
    SelfieCameraTypes.SMART
  ).then(cameraOpener => {
    cameraOpener.open(callback);
  }).catch(error => {
    console.error(error);
    // confira na aba "Referências" sobre os erros possíveis
  });
TThe method prepareSelfieCameraForIFrame() only works if the implementation is inside an iFrame. Using it outside of an iFrame will result in error 73724. Similarly, using the method prepareSelfieCamera() inside an iFrame will also result in error 73724.
Implementing the iFrame Element
For the capture to work correctly, it is necessary to implement the <iframe> element as shown in the example below:
<iframe allow="fullscreen;camera;geolocation" allowFullScreen src="your_app_url"></iframe>Fullscreen Behavior
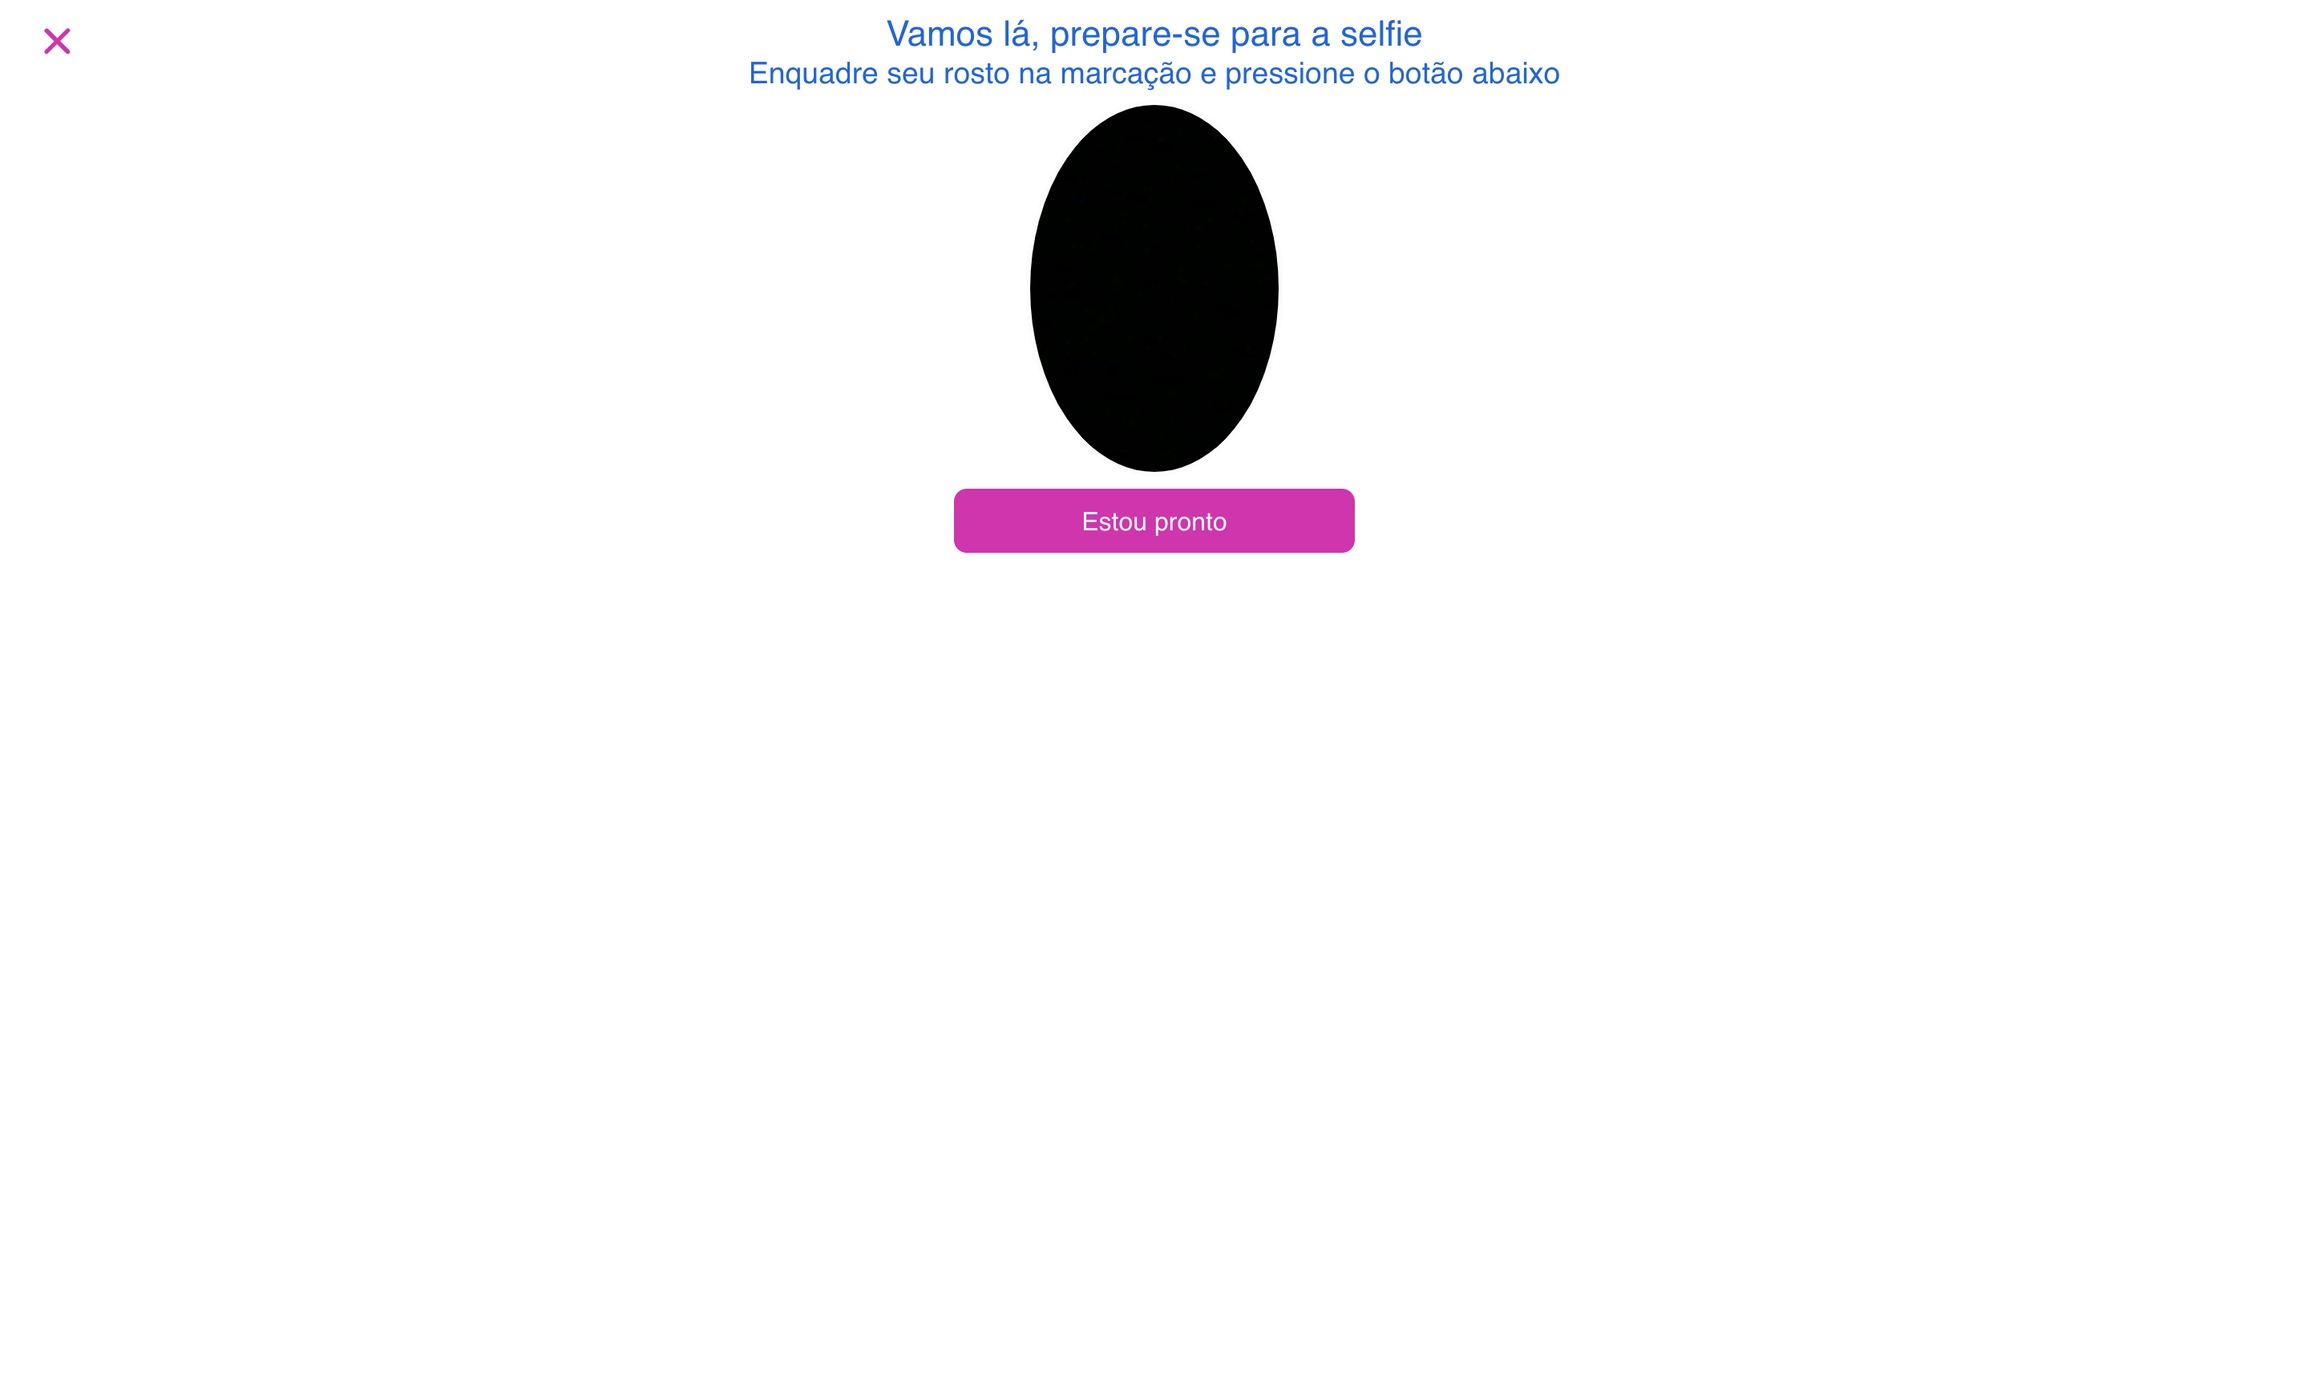
To perform the capture, it is required to be in full-screen mode in the browser so that the SDK can resize automatically. Therefore, when performing the capture, the SDK will display a screen requesting that the frame be opened in full-screen mode. See the following example:
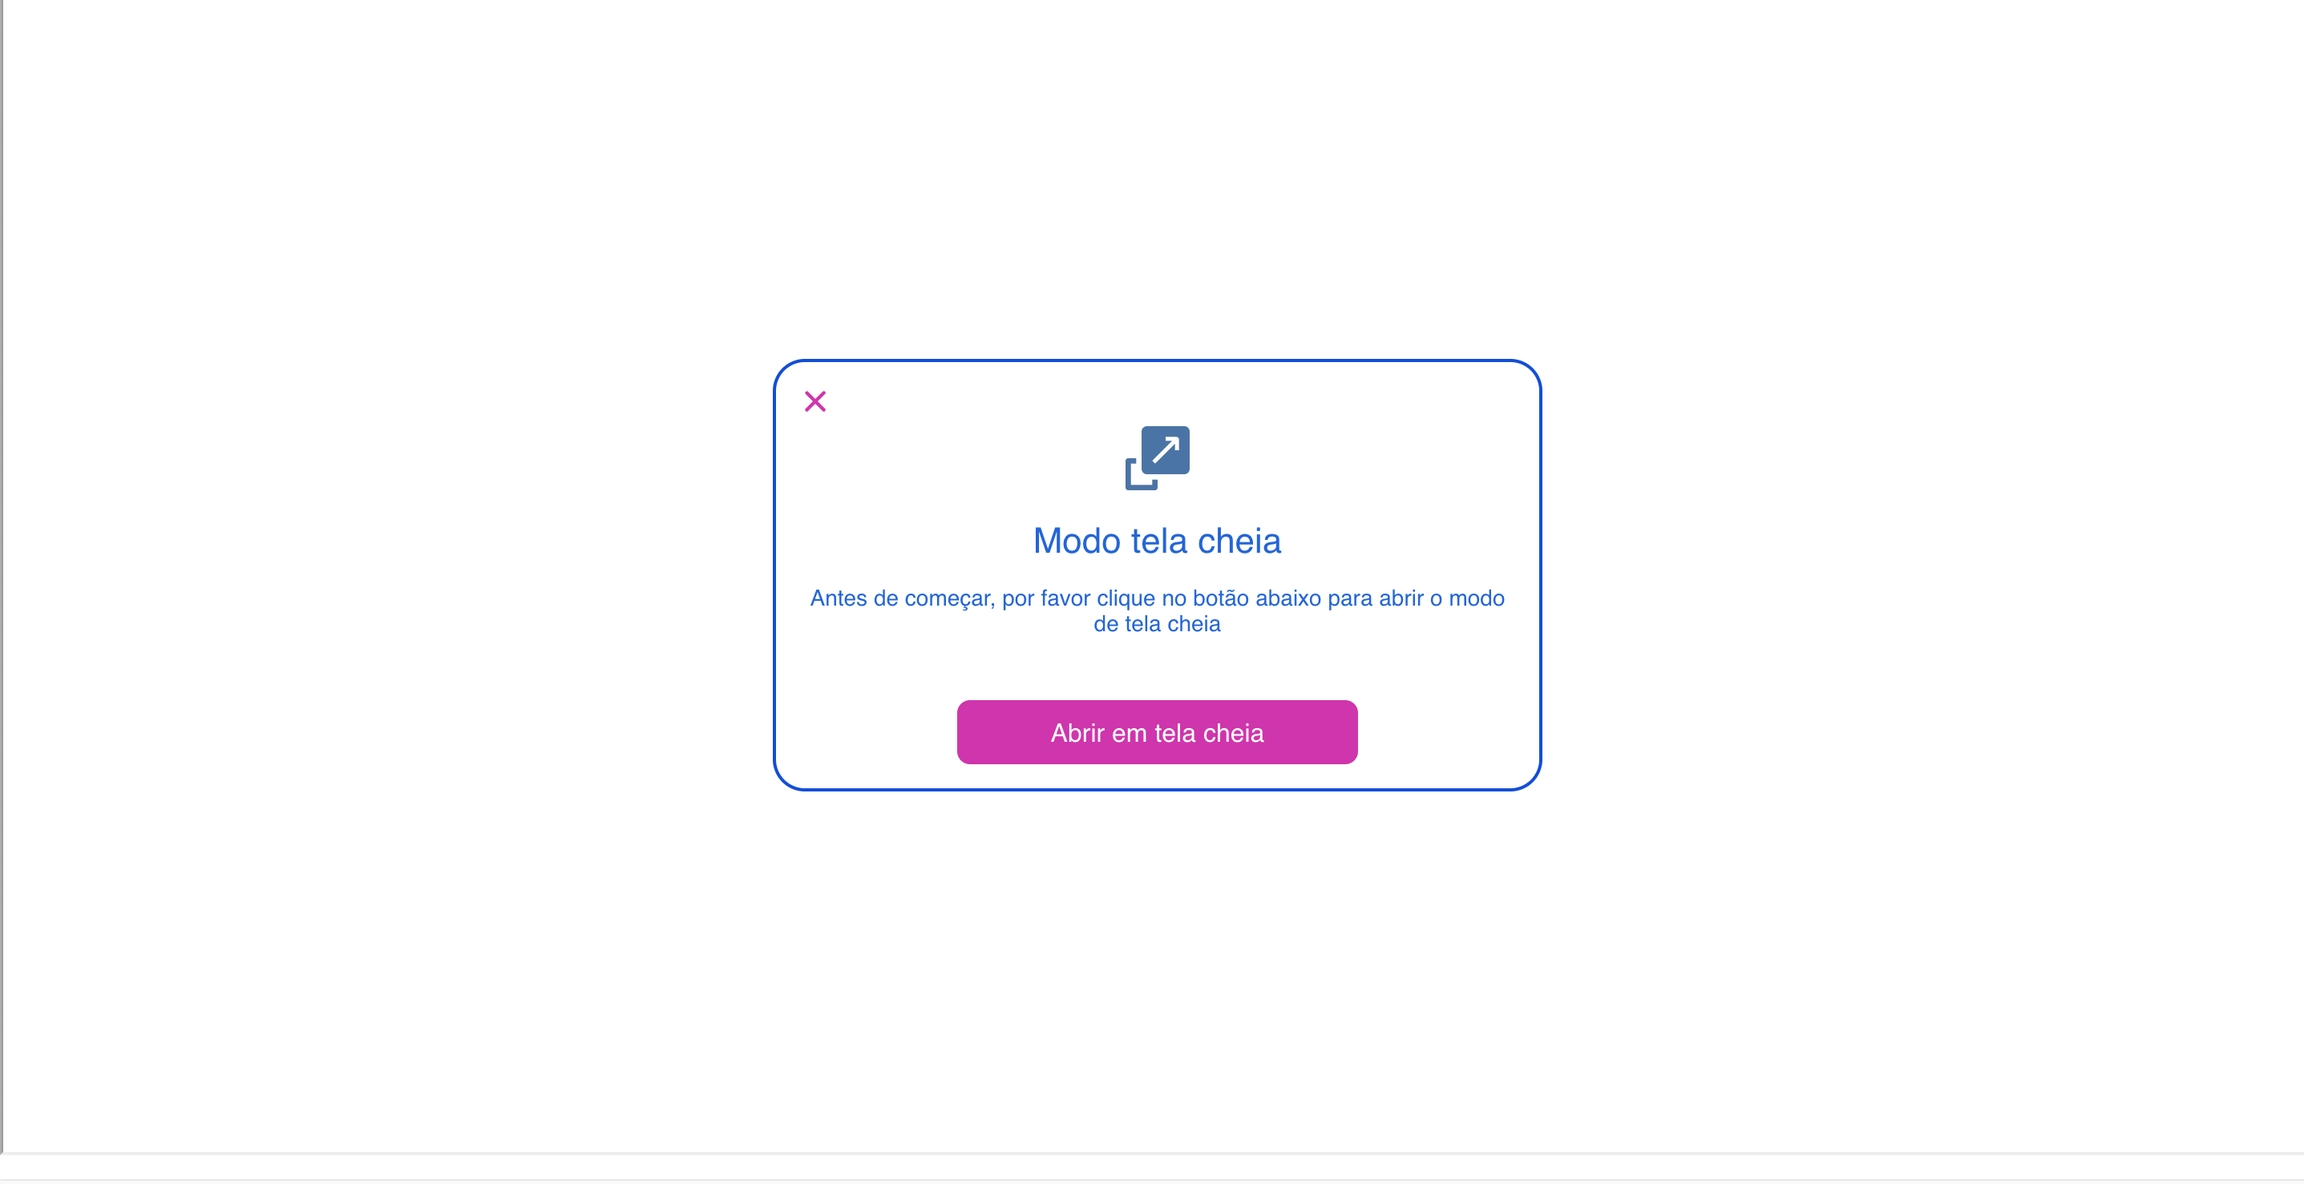
After allowing fullscreen usage, the capture frame will open normally:
Apple restricts the use of full-screen APIs specifically on iPhones (iPads are acceptable). Therefore, for captures on iPhones, it is necessary to manually configure the positioning of the iFrame.
Making a POST Request to the Client API
Capturing the images is only the first part of the journey. After capturing the image, it is necessary to send the encrypted data generated by the SDK to the by Client REST APIs. For more information, refer to the CreateProcess section of by Client.
For security reasons, the interval between generating the encrypted data and sending it via one of the available flows should be no more than 10 minutes. Submissions made beyond this period will be automatically rejected by the API.
Still need help?
Didn't find something or still need help? If you're already a client or partner, you can reach out through our Help Center.
Last updated